sandwich_shop
Worksheet 6 — AI-Driven Development and Navigation
What you need to know beforehand
Ensure that you have already completed the following:
- Worksheet 0 — Introduction to Dart, Git and GitHub.
- Worksheet 1 — Introduction to Flutter.
- Worksheet 2 — Stateless Widgets.
- Worksheet 3 — Stateful widgets.
- Worksheet 4 — App Architecture and Testing.
- Worksheet 5 — Data Models and Assets.
Getting help
To get support with this worksheet, join the Discord channel and ask your questions there. Otherwise, attend your timetabled session and ask a member of staff for help.
Getting started
For this worksheet, you need to start with the code from branch 6 of our GitHub repository. You can either clone the repository and checkout branch 6:
git clone https://github.com/manighahrmani/sandwich_shop.git
cd sandwich_shop
git checkout 6
Or manually ensure your code matches the repository. Run the app to make sure everything works as expected before proceeding.
Introduction to AI-Driven Development
One of the learning outcomes of this module is AI-driven development. We have been hinting at this in the earlier worksheets, but let’s formalise things a little. Below are the different ways developers use AI:
-
Vibe Coding: This refers to the informal and passive approach where developers ask AI for quick solutions without much structure or planning. While this can be useful for simple tasks, it is not sustainable for larger projects and often leads to inconsistent results and technical debt.
-
Prompt Engineering: The practice of crafting specific, well-structured prompts to get better results from AI models. This involves understanding how to communicate effectively with AI to get the desired output.
-
Prompt-driven Development (PDD): A more systematic approach where developers use carefully crafted prompts to guide AI through the entire development process. Prompts, often in Markdown format (ending with
.md), are stored alongside the codebase, modified and refined over time just like code itself. The overall aim is to make AI-driven development a more structured, reproducible and reliable process.
Among some of the advantages of PDD is that well-structured prompts produce more consistent and predictable results. AI can be unpredictable, and predictability is a quality we want in software development. Detailed requirements lead to better code quality and fewer bugs, and if any generated code has issues, we can always go back to the prompt and refine it.
You can learn more about using AI for feature implementation in this video: AI-Powered App Development with Flutter. The section at 16:58 (Copilot Vision) is particularly relevant for your coursework, as it shows how you can use images and prompts to guide the AI.
Prompt-Driven Development in Practice
Instead of jumping straight into coding, let’s start by using AI to help us write proper requirements for a new feature.
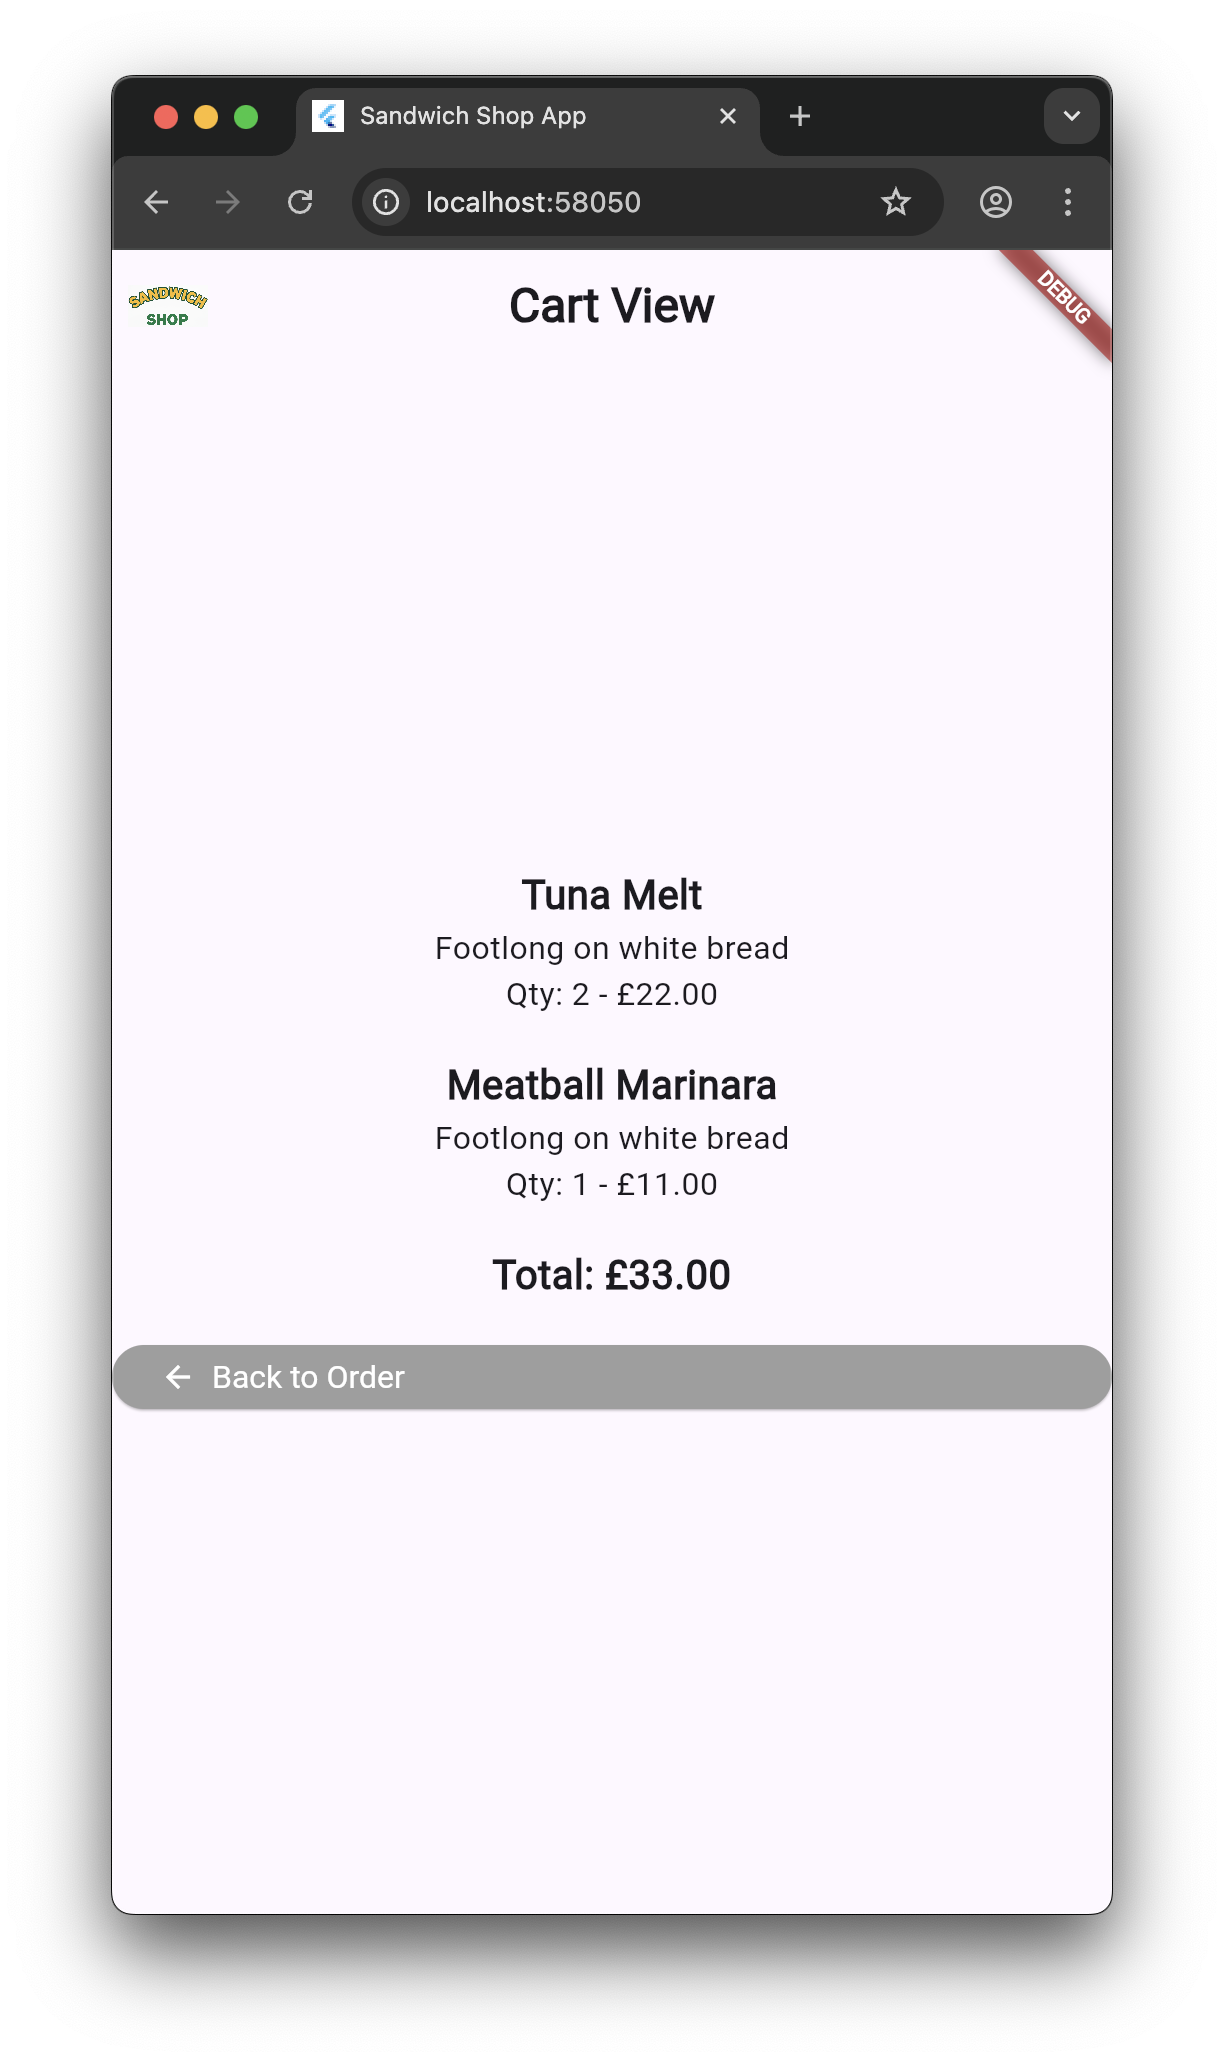
Run the app and add a few sandwiches to your cart. You should see a snack bar confirming the addition. You will also see that we have implemented a second screen, CartScreen in lib/views/cart_screen.dart, that displays the items in the cart. You can navigate to this screen from the order screen by pressing the “View Cart” button. This is what the cart page should look like:
Let’s say we want to enhance our cart functionality. Instead of immediately asking for code, we’ll first ask our AI assistant to help us create a prompt. Here’s a sample prompt you can use (if you are using Copilot, set it to “Ask” mode):
I have a sandwich shop app written in Flutter. I need your help writing good prompt I can send to an LLM to help me implement a new feature.

I have two pages: an order screen where users can select sandwiches and add them to their cart, and a cart screen where users can see the items in their cart and the total price.

I want to let the users modify the items in their cart. There are different ways a user might want to modify their cart like changing quantity or removing items entirely.

For each of these features, include a clear description and what should happen when the user performs an action. Output the result in a Markdown code block.
This initial prompt can be improved by adding more specific details about the current app structure. You could, for example, include:
The app currently has these models:
- Sandwich (with type, size, bread type)
- Cart (with add/remove/clear methods and total price calculation)
It also has one repository:
- Pricing (calculates prices based on quantity and size; the price of a sandwich has nothing to do with its type or bread)
This is what we initially got back from the AI: prompt.md. You can also talk about the UI requirements or edge cases you want the code to handle. For example, if the user tries to reduce the quantity of an item below 1, it should be removed from the cart.
Save the output as prompt.md in your project directory. Review the document and manually edit it if needed.
In our case, we asked the AI to refine the prompt after providing it with a screenshot of the current cart page and an overview of the app structure. You could also provide the AI with screenshots of other apps such as Deliveroo or Uber Eats to give it a better idea of what you want.
This is what we ended up with: prompt.md.
Commit your changes (1)
Before moving on, commit your prompt file with an appropriate commit message. Remember, in PDD, prompts are part of the codebase.
Creating a Requirements Document
Once you have a solid prompt, you can use AI to write a requirements document. Here’s a sample prompt you can use:
Write a detailed requirements document for the feature described in my previous prompt. The requirements should include:

1. A clear description of the feature and its purpose.
2. User stories that describe how different users will interact with the feature.
3. Acceptance criteria that define when the feature is considered complete.

Respond in a structured Markdown format with separate subtasks.
This is what we got back from Copilot after a few modifications: requirements.md.
Commit your changes
Before implementing the feature, commit your requirements document with an appropriate commit message.
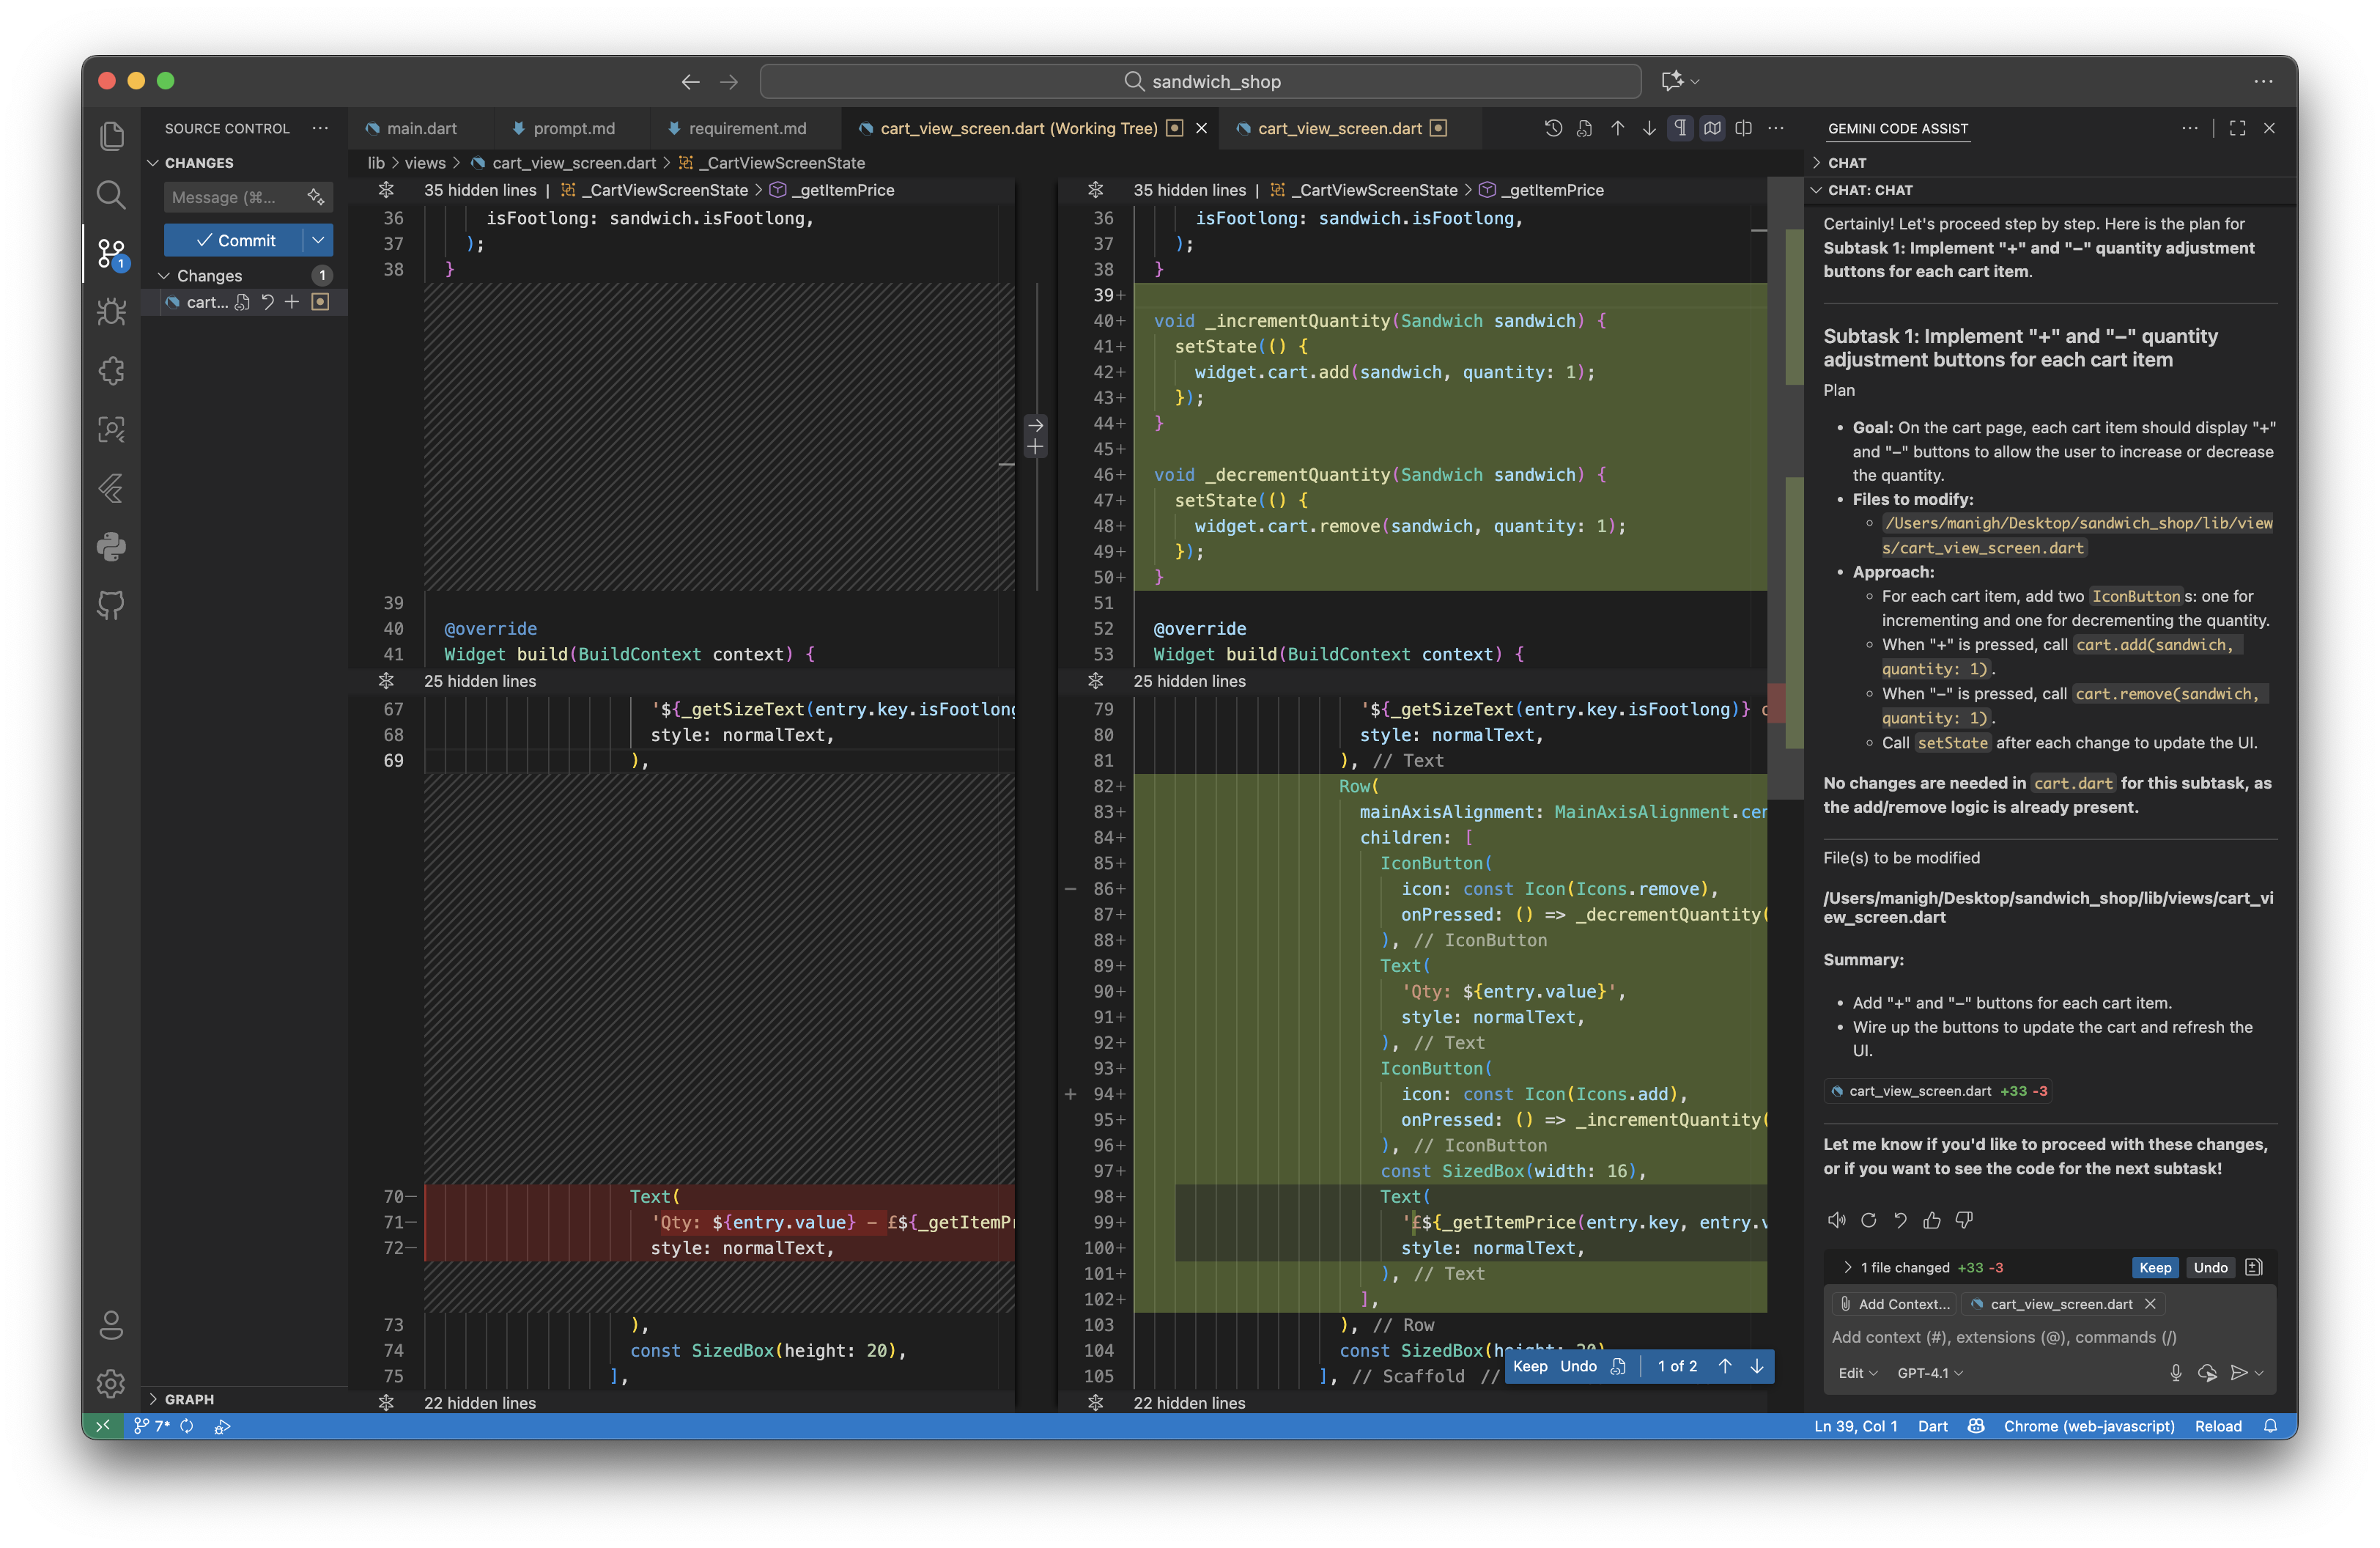
From Requirements to Implementation
Now that you have a clear requirements document, you can use it to guide your implementation. Here’s a sample prompt you can use:
Let's implement the feature described in my requirements document.

Implement each subtask separately, as I want to commit each one individually. For each subtask, explain your changes in detail, show me what files you are modifying, and then we can proceed to the next subtask.
Remember, when using Copilot, you can set it to “Edit” mode to let it modify your files directly. Additionally, provide it with context by pasting relevant parts of your codebase (you can do this by typing a hash symbol # followed by the name of the file, for example #cart.dart).
Notice how you can pause after each subtask to review the changes. It is an important part of the PDD process to read, test, and commit each change separately. This allows you to ensure the AI is producing code that meets your requirements and adheres to best practices.
 Once you have completed all the subtasks, test your app to ensure everything works as expected. As before, update the widget tests for the cart screen in
 test/views/cart_screen_test.dart to cover the new functionality.
Here is a screenshot of our cart page after implementing the modifications:

As before, remember to update the widget tests for the cart_screen.dart in test/views/cart_screen_test.dart to cover the new functionality you have added.
Commit your changes (2)
Once you have implemented and tested the feature, commit your changes with an appropriate commit message.
Navigation in Flutter
In one of the exercises from last week’s worksheet, we started creating a cart screen and navigating to it. This week’s code provides our implementation of that screen. Let’s take a closer look at how navigation works in Flutter.
Here are some key terms to understand:
- Route: A route is a screen or a page in your app. This is equivalent to an
Activityin Android or aViewControllerin iOS. - Navigator: A widget that manages a stack of routes. It handles pushing new routes onto the stack (navigating to a new screen) and popping them off (going back).
Think of navigation as a stack of cards. When you navigate to a new screen, you place (push) a new card on top of the stack. When you go back, you remove (pop) the top card, revealing the screen underneath.
For our sandwich shop app, basic navigation using Navigator.push() and Navigator.pop() is sufficient.
Basic Navigation
Our current navigation pattern is the most common and simple one.
In lib/views/order_screen.dart, the “View Cart” button’s onPressed callback calls the _navigateToCartView() method:
void _navigateToCartView() {
  Navigator.push(
    context,
    MaterialPageRoute<void>(
      builder: (BuildContext context) => CartScreen(cart: _cart),
    ),
  );
}
The Navigator.push() method takes the current BuildContext and a MaterialPageRoute that builds the new screen. The builder function returns the widget for the new screen, in this case CartScreen.
Basically, all you need to know is that Navigator.push() adds a new screen on top of the current one, in this case, CartScreen:
class CartScreen extends StatefulWidget {
  final Cart cart;

  const CartScreen({super.key, required this.cart});

  @override
  State<CartScreen> createState() {
    return _CartScreenState();
  }
}
When the user wants to go back, the “Back to Order” button in the cart screen calls Navigator.pop(context) to return to the previous screen.
Showing Messages Across Navigation
It is important to note that Flutter provides a way to show messages that persist across navigation. In our code, we use ScaffoldMessenger to show snack bars:
ScaffoldMessenger.of(context).showSnackBar(snackBar);
This is important because ScaffoldMessenger ensures the message is shown even if the user navigates to a different screen while it’s appearing. Try this: add a sandwich to your cart, then immediately navigate to the cart view. You’ll see the confirmation message appears on the cart screen, not just the order screen.
Passing Data Between Screens
Passing Data Forwards
Often, you need to send data to a new screen. This is already being done in your app. When navigating to the cart screen, we are already passing the _cart object to the CartScreen constructor:
CartScreen(cart: _cart)
The CartScreen then receives this data through its constructor:
class CartScreen extends StatefulWidget {
  final Cart cart;

  const CartScreen({super.key, required this.cart});
  // ...
}
This is the standard way to pass data to a new screen in Flutter.
Returning Data from a Screen
Things become slightly more complex when you want to get data back from a screen. For example, you might want to return a confirmation after an order is placed. Let’s implement a checkout flow to demonstrate this.
First, create a new file lib/views/checkout_screen.dart and add the following code:
import 'package:flutter/material.dart';
import 'package:sandwich_shop/views/app_styles.dart';
import 'package:sandwich_shop/models/cart.dart';
import 'package:sandwich_shop/models/sandwich.dart';
import 'package:sandwich_shop/repositories/pricing_repository.dart';

class CheckoutScreen extends StatefulWidget {
  final Cart cart;

  const CheckoutScreen({super.key, required this.cart});

  @override
  State<CheckoutScreen> createState() => _CheckoutScreenState();
}

class _CheckoutScreenState extends State<CheckoutScreen> {
  bool _isProcessing = false;

  Future<void> _processPayment() async {
    setState(() {
      _isProcessing = true;
    });

    // A fake delay to simulate payment processing
    await Future.delayed(const Duration(seconds: 2));

    final DateTime currentTime = DateTime.now();
    final int timestamp = currentTime.millisecondsSinceEpoch;
    final String orderId = 'ORD$timestamp';

    final Map orderConfirmation = {
      'orderId': orderId,
      'totalAmount': widget.cart.totalPrice,
      'itemCount': widget.cart.countOfItems,
      'estimatedTime': '15-20 minutes',
    };

    // Check if this State object is being shown in the widget tree
    if (mounted) {
      // Pop the checkout screen and return to the order screen with the confirmation
      Navigator.pop(context, orderConfirmation);
    }
  }

  double _calculateItemPrice(Sandwich sandwich, int quantity) {
    PricingRepository repo = PricingRepository();
    return repo.calculatePrice(
        quantity: quantity, isFootlong: sandwich.isFootlong);
  }

  @override
  Widget build(BuildContext context) {
    List<Widget> columnChildren = [];

    columnChildren.add(const Text('Order Summary', style: heading2));
    columnChildren.add(const SizedBox(height: 20));

    for (MapEntry<Sandwich, int> entry in widget.cart.items.entries) {
      final Sandwich sandwich = entry.key;
      final int quantity = entry.value;
      final double itemPrice = _calculateItemPrice(sandwich, quantity);

      final Widget itemRow = Row(
        mainAxisAlignment: MainAxisAlignment.spaceBetween,
        children: [
          Text(
            '${quantity}x ${sandwich.name}',
            style: normalText,
          ),
          Text(
            '£${itemPrice.toStringAsFixed(2)}',
            style: normalText,
          ),
        ],
      );

      columnChildren.add(itemRow);
      columnChildren.add(const SizedBox(height: 8));
    }

    columnChildren.add(const Divider());
    columnChildren.add(const SizedBox(height: 10));

    final Widget totalRow = Row(
      mainAxisAlignment: MainAxisAlignment.spaceBetween,
      children: [
        const Text('Total:', style: heading2),
        Text(
          '£${widget.cart.totalPrice.toStringAsFixed(2)}',
          style: heading2,
        ),
      ],
    );
    columnChildren.add(totalRow);
    columnChildren.add(const SizedBox(height: 40));

    columnChildren.add(
      const Text(
        'Payment Method: Card ending in 1234',
        style: normalText,
        textAlign: TextAlign.center,
      ),
    );
    columnChildren.add(const SizedBox(height: 20));

    if (_isProcessing) {
      columnChildren.add(
        const Center(
          child: CircularProgressIndicator(),
        ),
      );
      columnChildren.add(const SizedBox(height: 20));
      columnChildren.add(
        const Text(
          'Processing payment...',
          style: normalText,
          textAlign: TextAlign.center,
        ),
      );
    } else {
      columnChildren.add(
        ElevatedButton(
          onPressed: _processPayment,
          child: const Text('Confirm Payment', style: normalText),
        ),
      );
    }

    return Scaffold(
      appBar: AppBar(
        title: const Text('Checkout', style: heading1),
      ),
      body: Padding(
        padding: const EdgeInsets.symmetric(horizontal: 16.0),
        child: Column(
          children: columnChildren,
        ),
      ),
    );
  }
}
Commit your changes (3)
Commit your changes and add widget tests for the new checkout screen in test/views/checkout_screen_test.dart.
Now, update lib/views/cart_screen.dart. First, add the necessary import at the top of the file:
import 'package:sandwich_shop/views/checkout_screen.dart';
In the _CartScreenState class, add this method to navigate to the checkout screen and handle the returned data:
Future<void> _navigateToCheckout() async {
  if (widget.cart.items.isEmpty) {
    ScaffoldMessenger.of(context).showSnackBar(
      const SnackBar(
        content: Text('Your cart is empty'),
        duration: Duration(seconds: 2),
      ),
    );
    return;
  }

  final result = await Navigator.push(
    context,
    MaterialPageRoute(
      builder: (context) => CheckoutScreen(cart: widget.cart),
    ),
  );

  if (result != null && mounted) {
    setState(() {
      widget.cart.clear();
    });

    final String orderId = result['orderId'] as String;
    final String estimatedTime = result['estimatedTime'] as String;

    ScaffoldMessenger.of(context).showSnackBar(
      SnackBar(
        content:
            Text('Order $orderId confirmed! Estimated time: $estimatedTime'),
        duration: const Duration(seconds: 4),
        backgroundColor: Colors.green,
      ),
    );

    Navigator.pop(context);
  }
}
Finally, add a checkout button to your cart screen’s UI. In the build method of _CartScreenState, add this button just before the “Back to Order” button:
const SizedBox(height: 20),
Builder(
  builder: (BuildContext context) {
    final bool cartHasItems = widget.cart.items.isNotEmpty;
    if (cartHasItems) {
      return StyledButton(
        onPressed: _navigateToCheckout,
        icon: Icons.payment,
        label: 'Checkout',
        backgroundColor: Colors.orange,
      );
    } else {
      return const SizedBox.shrink();
    }
  },
),
const SizedBox(height: 20),
The _navigateToCheckout() method uses await when calling Navigator.push() to wait for the checkout screen to return data, which we store in result. When the payment is processed, the checkout screen calls Navigator.pop(context, orderConfirmation) to return the data.
We check that the result is not null and that the widget is still mounted (i.e., it hasn’t been disposed of). If so, we clear the cart, update the UI, and show a success message with the order details.
Run your app and test the full checkout flow.
Commit your changes (4)
Commit the changes for integrating the checkout screen and update any relevant widget tests.
Named Routes and Flutter Web Routing
Before diving into the exercises, let’s explore how Flutter handles routing, especially for web applications. We’ll create a simple example to demonstrate named routes.
First, create a basic About Us page. Create a new file lib/views/about_screen.dart:
import 'package:flutter/material.dart';
import 'package:sandwich_shop/views/app_styles.dart';

class AboutScreen extends StatelessWidget {
  const AboutScreen({super.key});

  @override
  Widget build(BuildContext context) {
    return Scaffold(
      appBar: AppBar(
        title: const Text('About Us', style: heading1),
      ),
      body: const Padding(
        padding: EdgeInsets.all(16.0),
        child: Column(
          crossAxisAlignment: CrossAxisAlignment.start,
          children: [
            Text('Welcome to Sandwich Shop!', style: heading2),
            SizedBox(height: 20),
            Text(
              'We are a family-owned business dedicated to serving the best sandwiches in town. '
              style: normalText,
            ),
          ],
        ),
      ),
    );
  }
}
Now, update the App class in your main.dart file to include named routes using the routes property:
class App extends StatelessWidget {
  const App({super.key});

  @override
  Widget build(BuildContext context) {
    return const MaterialApp(
      title: 'Sandwich Shop App',
      home: OrderScreen(maxQuantity: 5),
      routes: {
        '/about': (context) => AboutScreen(),
      },
    );
  }
}
Alternatively, for more complex routing scenarios, you can use onGenerateRoute:
class App extends StatelessWidget {
  const App({super.key});

  @override
  Widget build(BuildContext context) {
    return MaterialApp(
      title: 'Sandwich Shop App',
      home: const OrderScreen(maxQuantity: 5),
      onGenerateRoute: (settings) {
        switch (settings.name) {
          case '/about':
            return MaterialPageRoute(builder: (_) => const AboutScreen());
          default:
            return MaterialPageRoute(builder: (_) => const OrderScreen(maxQuantity: 5));
        }
      },
    );
  }
}
Flutter web uses hash-based routing by default. When you run your app in a browser, URLs look like http://localhost:49856/#/about. The structure breaks down as:
http://localhost:49856/- base URL#/about- the hash fragment that Flutter interprets as the route
This means users can navigate directly to specific screens by typing URLs in their browser, and the browser’s back button will work correctly.
Test this by running your app in a web browser and typing localhost:PORT/#/about in the address bar (replace PORT with the port number your app is running on). You should be able to navigate directly to the About screen.
Exercises
Complete the exercises below. Remember to commit your changes after each exercise.
-
Add one new screen to your app. This can be a profile or sign-up/sign-in screen where users can enter and/or view their details. For now, you can add a link to this screen at the bottom of your order screen (we will fix this in the next exercise). There’s no need to perform any actual authentication or data persistence yet.
As we did earlier in this worksheet, use your AI assistant and have it write you a prompt for this feature and update or append to the
requirements.mdfile accordingly. Verify/update the changes inrequirements.mdbefore using it to implement the feature.Make sure to write widget tests for your new profile screen too.
⚠️ Show your
requirements.md, profile screen and associated test(s) to a member of staff for a sign-off. -
Let’s enhance our app’s navigation by adding a
Drawermenu. ADraweris a panel that slides in from the edge of aScaffoldto show the app’s main navigation options. You can read more about it in its documentation page.Ask your AI assistant to explain how
Drawerwidgets work and how they integrate with theAppBar. Could you make this drawer accessible from all screens in your app? Is there any way to reduce the redundant code that this creates? As an extra challenge, make the navigation of your website responsive (different screen widths should make the navigation look and act differently). (Re)visit exercise 6 from Worksheet 2 for a hint.Make sure to add this new task to the
requirements.mdinstead of creating a new one. The existing information and completed tasks should technically speed up the implementation of the new feature and make it more consistent.As always, update your widget tests to cover the new navigation drawer (or generally, navigation) functionality.
⚠️ Show the updates to
requirements.md, working navigation and associated test(s) to a member of staff for a sign-off. -
(Advanced) Configure your app to handle deep links using
go_router, which is the recommended approach for URL-based navigation in Flutter.Add the
go_routerpackage to your project by runningflutter pub add go_router.Ask your AI assistant to help you refactor your app to use
MaterialApp.routerwithGoRouterinstead ofMaterialApp. You’ll need to define routes for your main screens like/,/cart, and/profile.Test your implementation by running the app on a web browser and typing URLs like
localhost:PORT/#/cartin the address bar (wherePORTis the port number your app is running on). The navigation should work correctly with proper browser back-button support.This task is optional and there’s no need to show it to a member of staff for a sign-off.
-
(Advanced) Create a settings screen where users can configure app-wide preferences, such as enabling dark mode or adjusting font sizes.
This exercise introduces you to data persistence. You can use the
shared_preferencespackage, which allows you to save simple key-value data that persists between app sessions. Add the package by runningflutter pub add shared_preferences.Your task is to create a settings screen and use
shared_preferencesto save at least one user preference. When the user changes a setting, save it. When the app restarts, this preference should be loaded and applied.This task is optional and there’s no need to show it to a member of staff for a sign-off.