sandwich_shop
Worksheet 1 — Introduction to Flutter
What you need to know beforehand
Ensure that you have already completed the following:
Getting help
To get support with this worksheet, join the Discord channel and ask your questions there. Otherwise, attend your timetabled session and ask a member of staff for help.
Set up your development environment
We first need to ensure all the necessary tools are installed on your computer. You can use Firebase Studio (a free browser-based IDE), the university computers, or your personal Mac or Windows computer. Skip to the section that matches your choice.
Firebase Studio
This is a temporary solution in case the university computers are not working as expected or if you do not have your laptop. You can access it from anywhere using a web browser. You will need a personal Google account to log in, not your university Google account.
Firebase Studio, previously known as Project IDX, provides a complete development environment in your browser, based on VS Code.
Creating a Flutter Project
Open idx.google.com in any browser and sign in with your personal Google account.
Once you have agreed to the terms and conditions, you will see a screen similar to the one below.
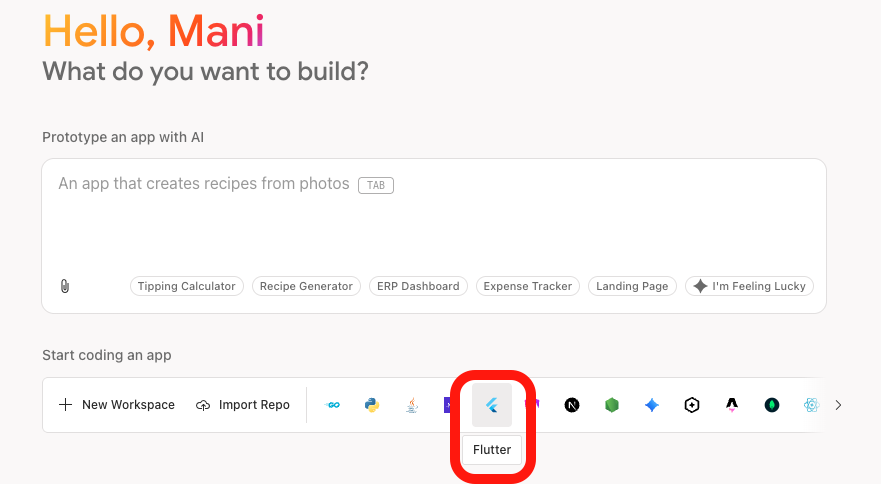
Select Flutter from the list of templates (it is a blue icon that looks like a tilted “F”). Give your workspace a name, such as sandwich_shop, and create it.
This will set up a complete Flutter project for you, ready to go. The interface will look very similar to VS Code, but it runs entirely in your browser.
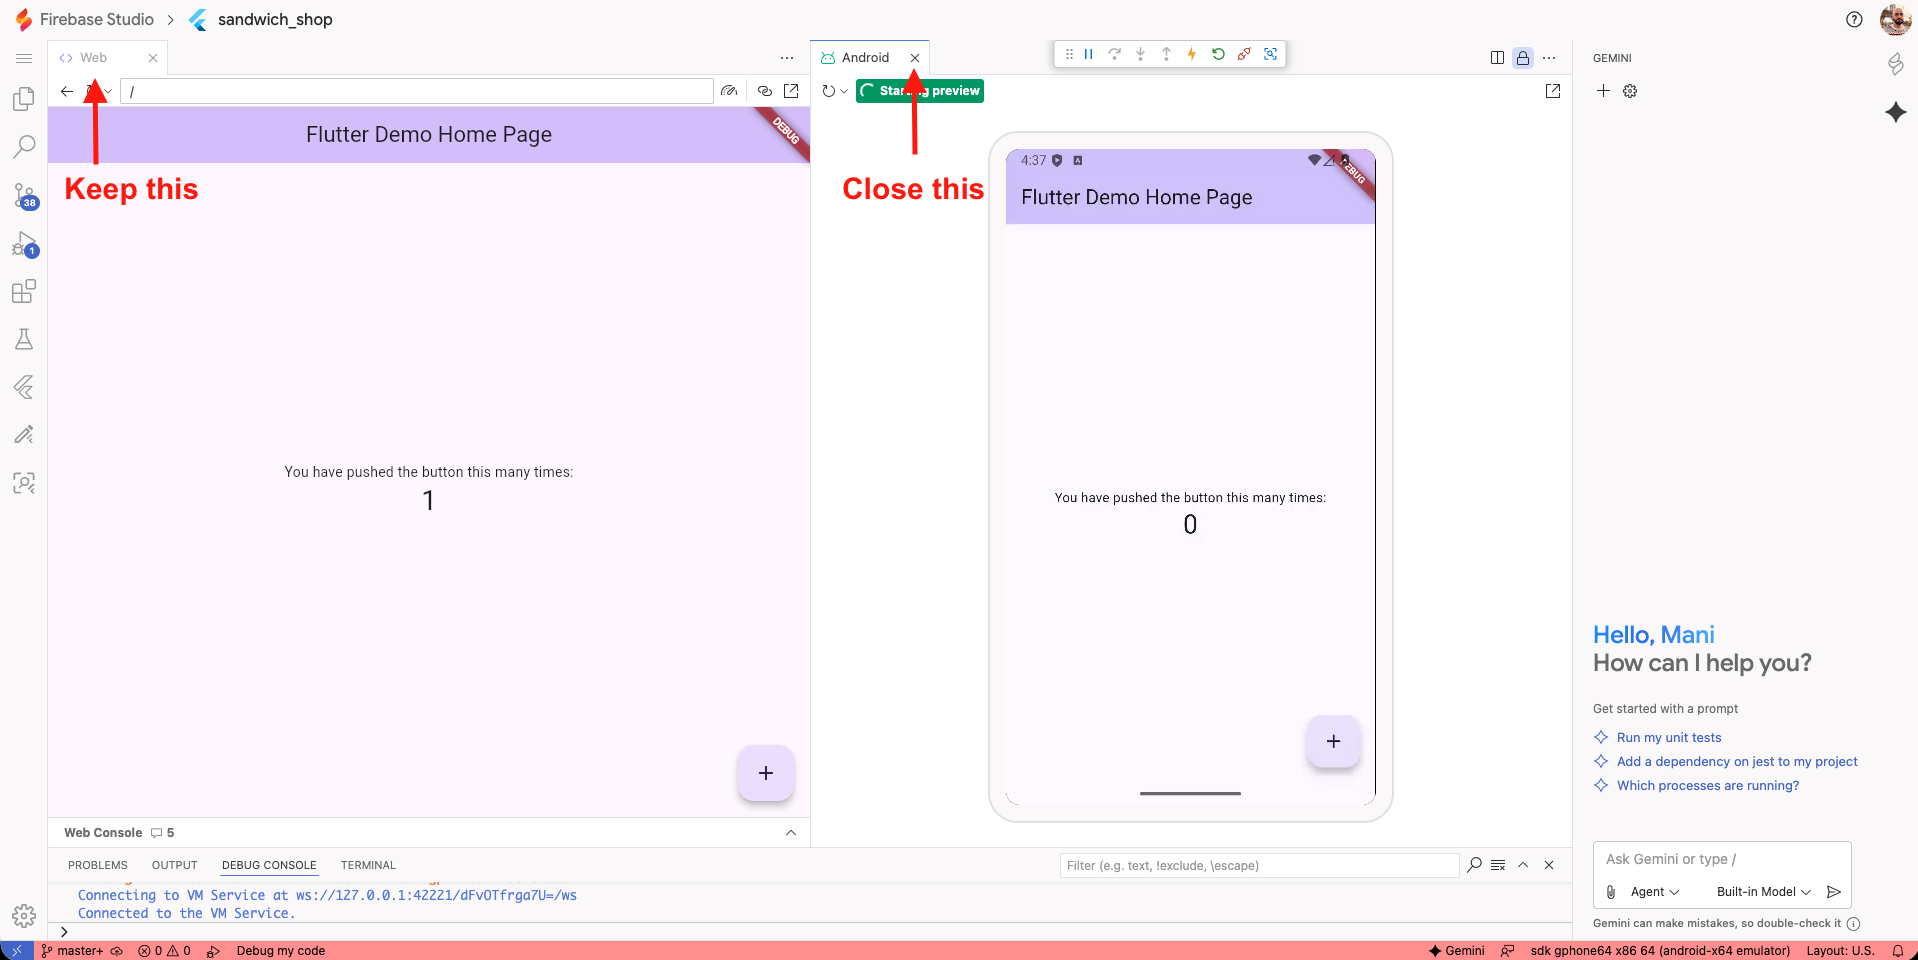
Running the app on Firebase studio is slightly different from a local VS Code setup. By default, your app should be running on both an Android emulator and a web browser. You can close the Android emulator as we will mainly be using web as our target device for most of the worksheets.
If it is not running, open the Command Palette with Ctrl + Shift + P (or ⌘ + Shift + P on macOS) and type Firebase Studio: Show Web Preview. Select it to start the web version of your app.
Continue with the rest of the worksheet as normal. The other minor difference is that instead of GitHub Copilot, Firebase Studio uses Google’s AI assistant called Gemini (you can see it on the right-hand side). You can use it in a similar way to Copilot by selecting code and asking questions about it.
University computers
Logging in to AppsAnywhere
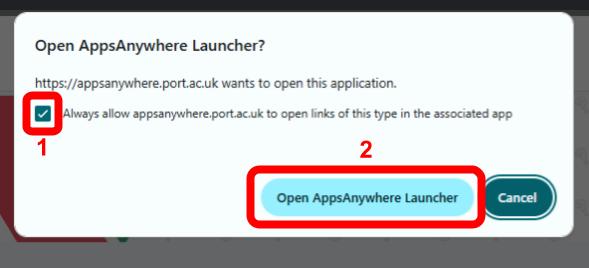
Use the shortcut on the desktop or head to AppsAnywhere using this link: appsanywhere.port.ac.uk. Once you have logged in, you will see a dialogue shown below. First, tick the box for “Always allow appsanywhere.port.ac.uk to open links of this type in the associated app” and then click on the “Open AppsAnywhere Launcher” button.
Installing Git
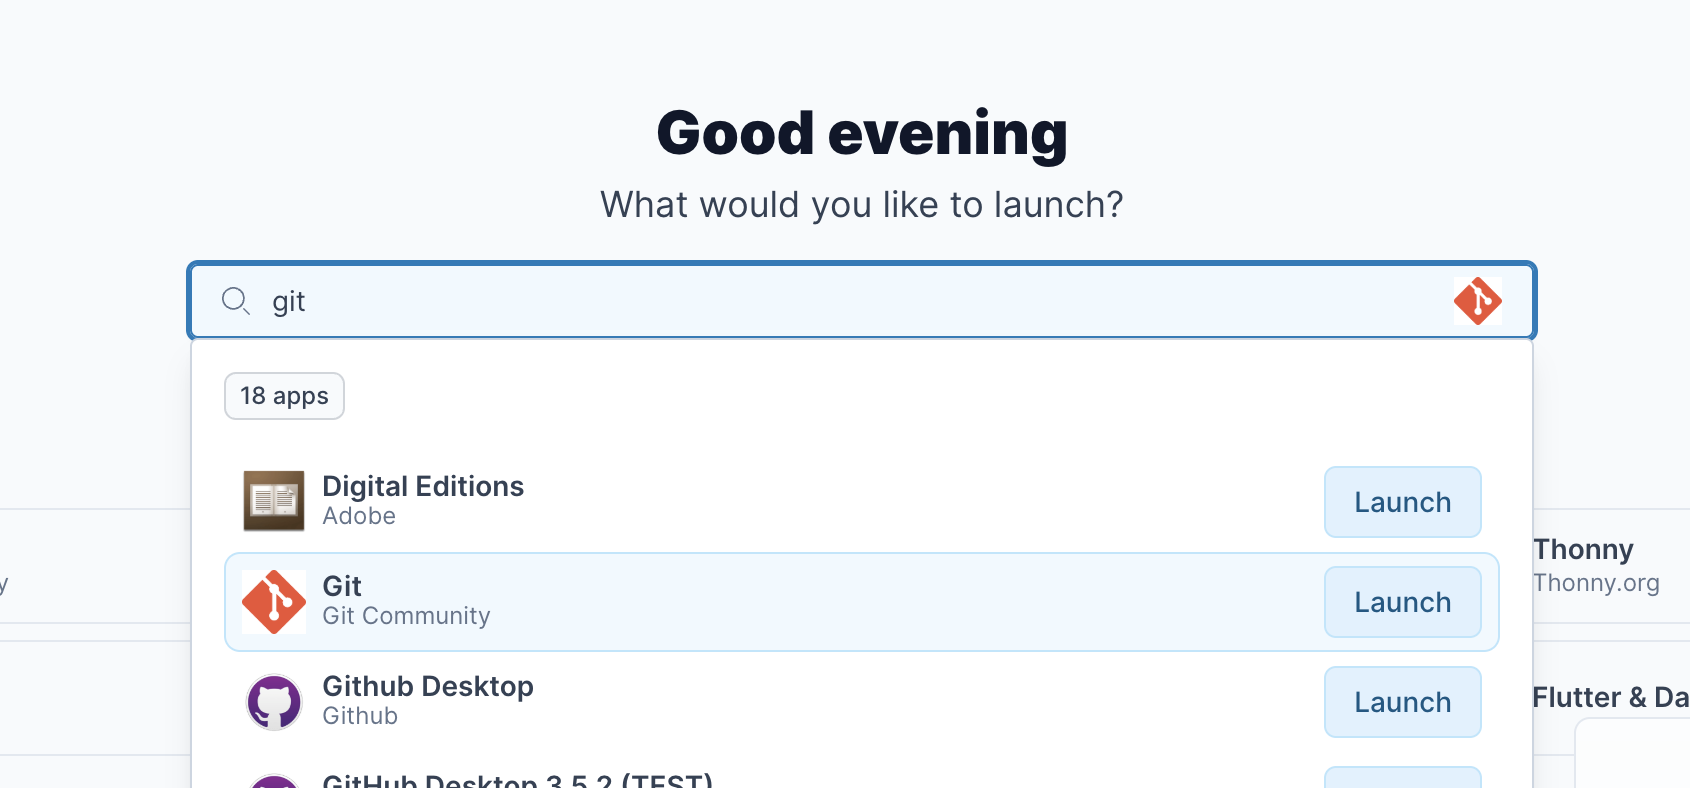
In AppsAnywhere, search for Git and click on launch. Do not select “GitHub Desktop”.
To verify the installation, open the Start Menu by pressing the Windows key, type Command Prompt or PowerShell, and select it. Write the following command in the terminal and press Enter:
git --version
You should see a version number indicating that Git is installed successfully.
Installing the Flutter SDK
In AppsAnywhere, search for Flutter And Dart SDK and click on launch.
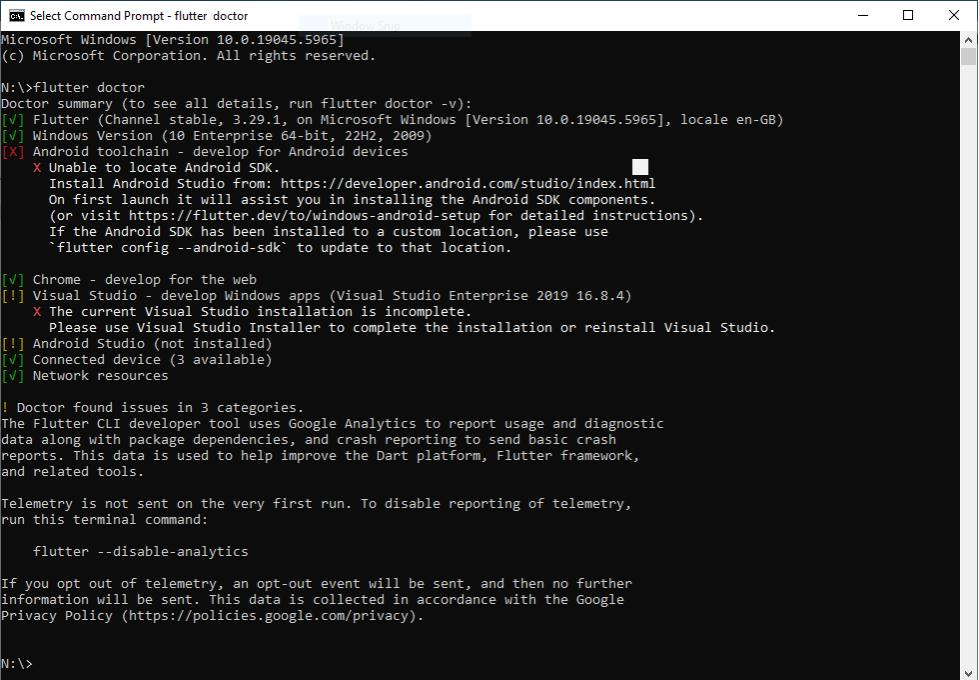
To verify the installation, enter the following in Command Prompt or PowerShell:
flutter doctor
This may take a while, but it should return a report of your Flutter installation status.
Installing Visual Studio Code
In AppsAnywhere, search for Visual Studio Code and launch it. It can take a while to load, so be patient.
Personal Windows computer
Opening the terminal on Windows
Open the Start Menu by pressing the Windows key, type PowerShell, and select Run as Administrator. You need administrator rights to install the package manager. If you don’t have this permission, use the university computers instead.
Installing the Chocolatey package manager
We will use a package manager called Chocolatey to easily install all the required tools. First, check if it’s already installed by running choco --version. If you see a version number, you can skip to the next step.
If it’s not installed, go to the Chocolatey installation page and follow the instructions. You should find a command similar to the one below:
Set-ExecutionPolicy Bypass -Scope Process -Force; [System.Net.ServicePointManager]::SecurityProtocol = [System.Net.ServicePointManager]::SecurityProtocol -bor 3072; iex ((New-Object System.Net.WebClient).DownloadString('https://community.chocolatey.org/install.ps1'))
Installing development tools on Windows
With Chocolatey installed, you can now install Git, Visual Studio Code, and the Flutter SDK. Run the following commands one by one in your PowerShell terminal with administrator rights:
choco install git -y
choco install vscode -y
choco install flutter -y
If you get an error about Dart being already installed, you can first remove it with the following command then reinstall Flutter with choco install flutter -y.
choco uninstall dart -y
Make sure to read any prompts carefully before closing the terminal. You may be asked to run additional commands to add Flutter to your system’s PATH variable.
Verifying the installation on Windows
Close your current terminal and open a new one, which doesn’t need to be run as an administrator. Run the following to check your installations:
flutter doctor
Personal macOS computer
Opening the terminal on macOS
You can open the built-in Terminal app by pressing ⌘ + Space to open Spotlight, typing Terminal, and pressing return.
Installing the Homebrew package manager
Homebrew is a package manager for macOS that simplifies installing software. To check if you have it installed, run brew --version in the terminal. If you see a version number, you can skip to the next step.
If it is missing, visit the Homebrew website and copy the installation command provided on the homepage. Paste it into your terminal and press return to install Homebrew. The command will look similar to this:
/bin/bash -c "$(curl -fsSL https://raw.githubusercontent.com/Homebrew/install/HEAD/install.sh)"
Installing development tools on macOS
Once Homebrew is ready, you can install the necessary tools by running the following commands in your terminal:
brew install --cask visual-studio-code
brew install --cask flutter
If you get an error about Dart being already installed, you can first remove it with the following command then reinstall Flutter with brew install --cask flutter.
brew uninstall dart
Make sure to read any prompts carefully before closing the terminal. You may be asked to run additional commands to add Flutter to your system’s PATH variable.
Verifying the installation on macOS
Close your current terminal and open a new one. Run the following command to check your installations:
flutter doctor
Your Flutter application
Now that our environment is set up, we can create our first Flutter project.
Setting up Visual Studio Code
To sync your VS Code settings, first open GitHub in your browser and log in.
Back in VS Code, click the Account icon in the bottom left corner and select Backup and Sync Settings. This should automatically sync your settings with your GitHub account.
![]()
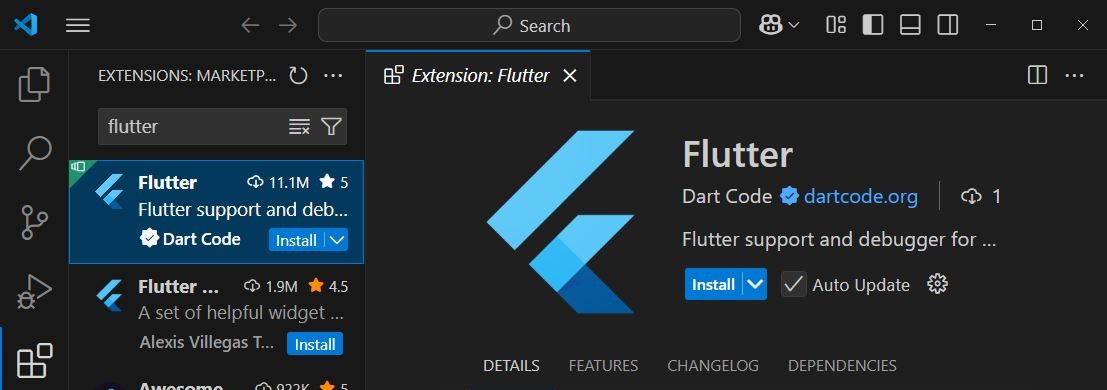
If this is your first time using VS Code, you’ll need to install the Flutter extension. Open the Extensions view by clicking the Extensions icon in the Activity Bar or by pressing Ctrl + Shift + X (Windows) or ⌘ + Shift + X (macOS). In the search bar, type Flutter and install the official extension.
Creating a new Flutter project
In VS Code, open the Command Palette using Ctrl + Shift + P (Windows) or ⌘ + Shift + P (macOS). In the palette, type Flutter: New Project and press Enter.
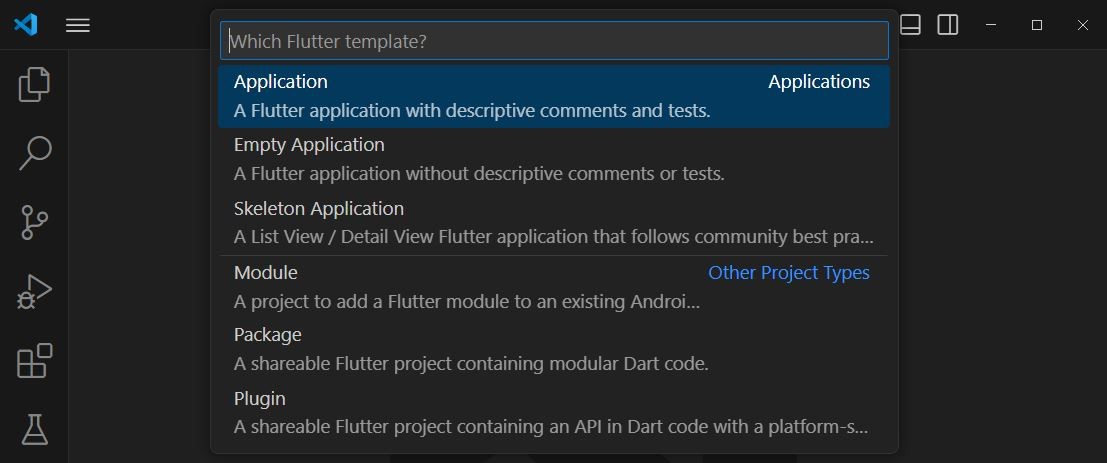
Select Application when prompted for a template. You will then be asked to choose a project location and name. Make a note of the location you choose.
Choose a name for your project, such as sandwich_shop, and press Enter. VS Code will now create a new Flutter project and open it for you.
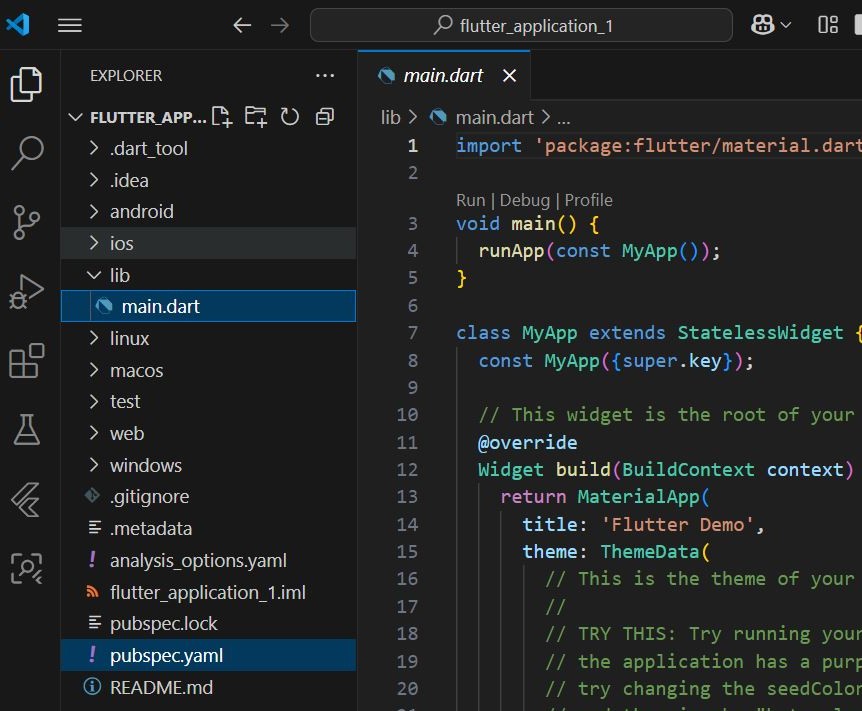
Understanding the project structure
You should see a new folder structure in the Explorer view on the left side of VS Code. You are encouraged to explore the files and folders, but the most important files for now are located in the lib/ folder. This folder contains your Dart application code with the main entry point being lib/main.dart (this is the file that runs when you start your app).
The term root of the project refers to the top-level directory of your project, which contains all the other files and folders. In this case, it’s the sandwich_shop folder.
There is a file called pubspec.yaml in the root directory, which is a configuration file for managing your project’s dependencies and assets.
You don’t need to understand the code at this moment but below is a brief overview.
The default application is a simple counter app. The lib/main.dart file contains the entry point void main() => runApp(const MyApp());, which runs the root widget, MyApp. This StatelessWidget sets up the MaterialApp and defines the home screen, which is the MyHomePage widget. MyHomePage is a StatefulWidget because it manages the changing counter value. It contains the _incrementCounter() method, which uses setState() to rebuild the UI when the _counter variable changes.
Using AI
We will learn more about stateless and stateful widgets in later worksheets. This is just a brief overview to get you started. But for now, we want you to use your AI tool of choice to explore the code.
Basics good practices of using AI
Remember that Large Language Models (LLMs) like Copilot, Gemini, ChatGPT, or Claude work best when you do all the following:
- Start with a specific goal for what you want the AI to do (e.g., explain, fix an error, implement a feature)
- Provide a source to ground the response so for example the AI does not make assumptions or use outdated information (for example you may need to copy and paste sections from the Flutter or Dart’s documentation)
- Add context to make sure the response is appropriate and relevant (e.g., project structure, code snippets, the platform you’re using)
- Set clear expectations for the response (e.g., level and length of the explanation, inclusion of examples)
- Refer to previous prompts and responses in your questions (e.g., ask follow-up questions or request clarifications)
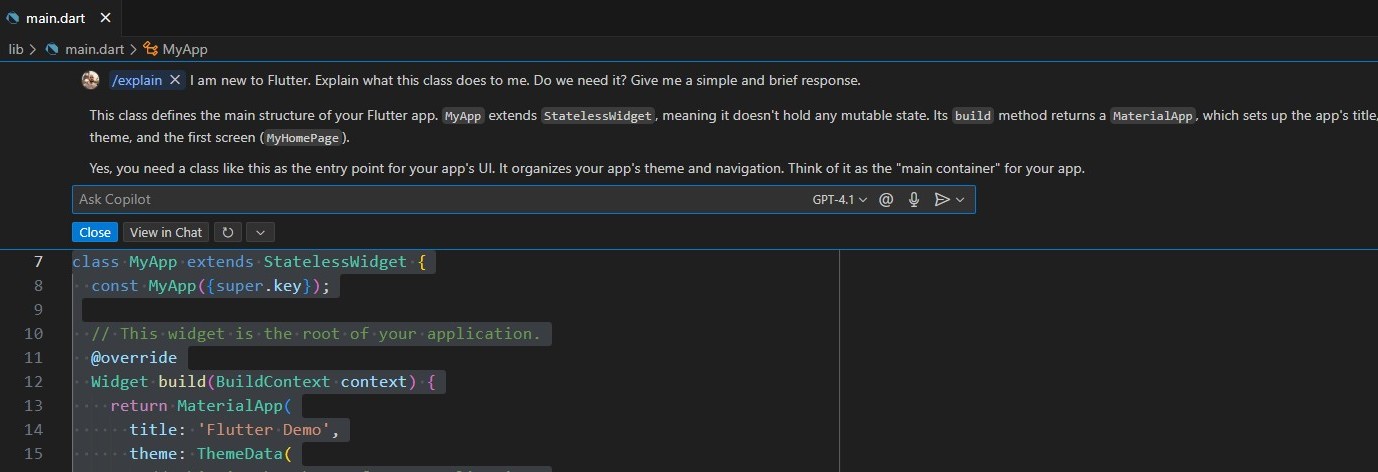
As an example, select a piece of code that you’d like to learn more about with your mouse. Then use the Copilot extension (Ctrl + I on Windows or ⌘ + I on macOS) to ask the AI questions like: “I am new to Flutter, what does the selected code do? Give me a brief and simple explanation”.
Structuring your prompts effectively
Copilot (and similarly Gemini in Firebase Studio) should automatically add the relevant code context to your question. You can add more context by using the # (hash) symbol or the attach button (📎) to reference other parts of the code or files in your project.
However if you’re using an LLM on the web (e.g., ChatGPT or Claude), you must provide the context manually.
A good way to structure your prompts, especially when using online LLMs, is to clearly separate your instructions from your code. This helps the AI understand exactly what you are asking about.
You can do this using code blocks. A code block is created by enclosing your code within three backticks (```). It is also good practice to specify the programming language, like dart, after the opening backticks to enable correct syntax highlighting and improve the AI’s understanding.
Be careful not to confuse the backtick character (` ) with a single quote (‘). The backtick key is usually located at the top-left of a UK keyboard, below the Esc key on a Windows keyboard, or next to the left Shift key on a Mac keyboard.
Here is an example of a well-structured prompt:
I am new to Flutter and trying to understand the code below from the default counter app.
Can you explain what the `build` method does in short and simple terms?

Here is the code I want you to explain:

```dart
@override
Widget build(BuildContext context) {
  return Scaffold(
    appBar: AppBar(
      backgroundColor: Theme.of(context).colorScheme.inversePrimary,
      title: Text(widget.title),
    ),
    body: Center(
      child: Column(
        mainAxisAlignment: MainAxisAlignment.center,
        children: <Widget>[
          const Text(
            'You have pushed the button this many times:',
          ),
          Text(
            '$_counter',
            style: Theme.of(context).textTheme.headlineMedium,
          ),
        ],
      ),
    ),
    floatingActionButton: FloatingActionButton(
      onPressed: _incrementCounter,
      tooltip: 'Increment',
      child: const Icon(Icons.add),
    ),
  );
}
```
Selecting a target device
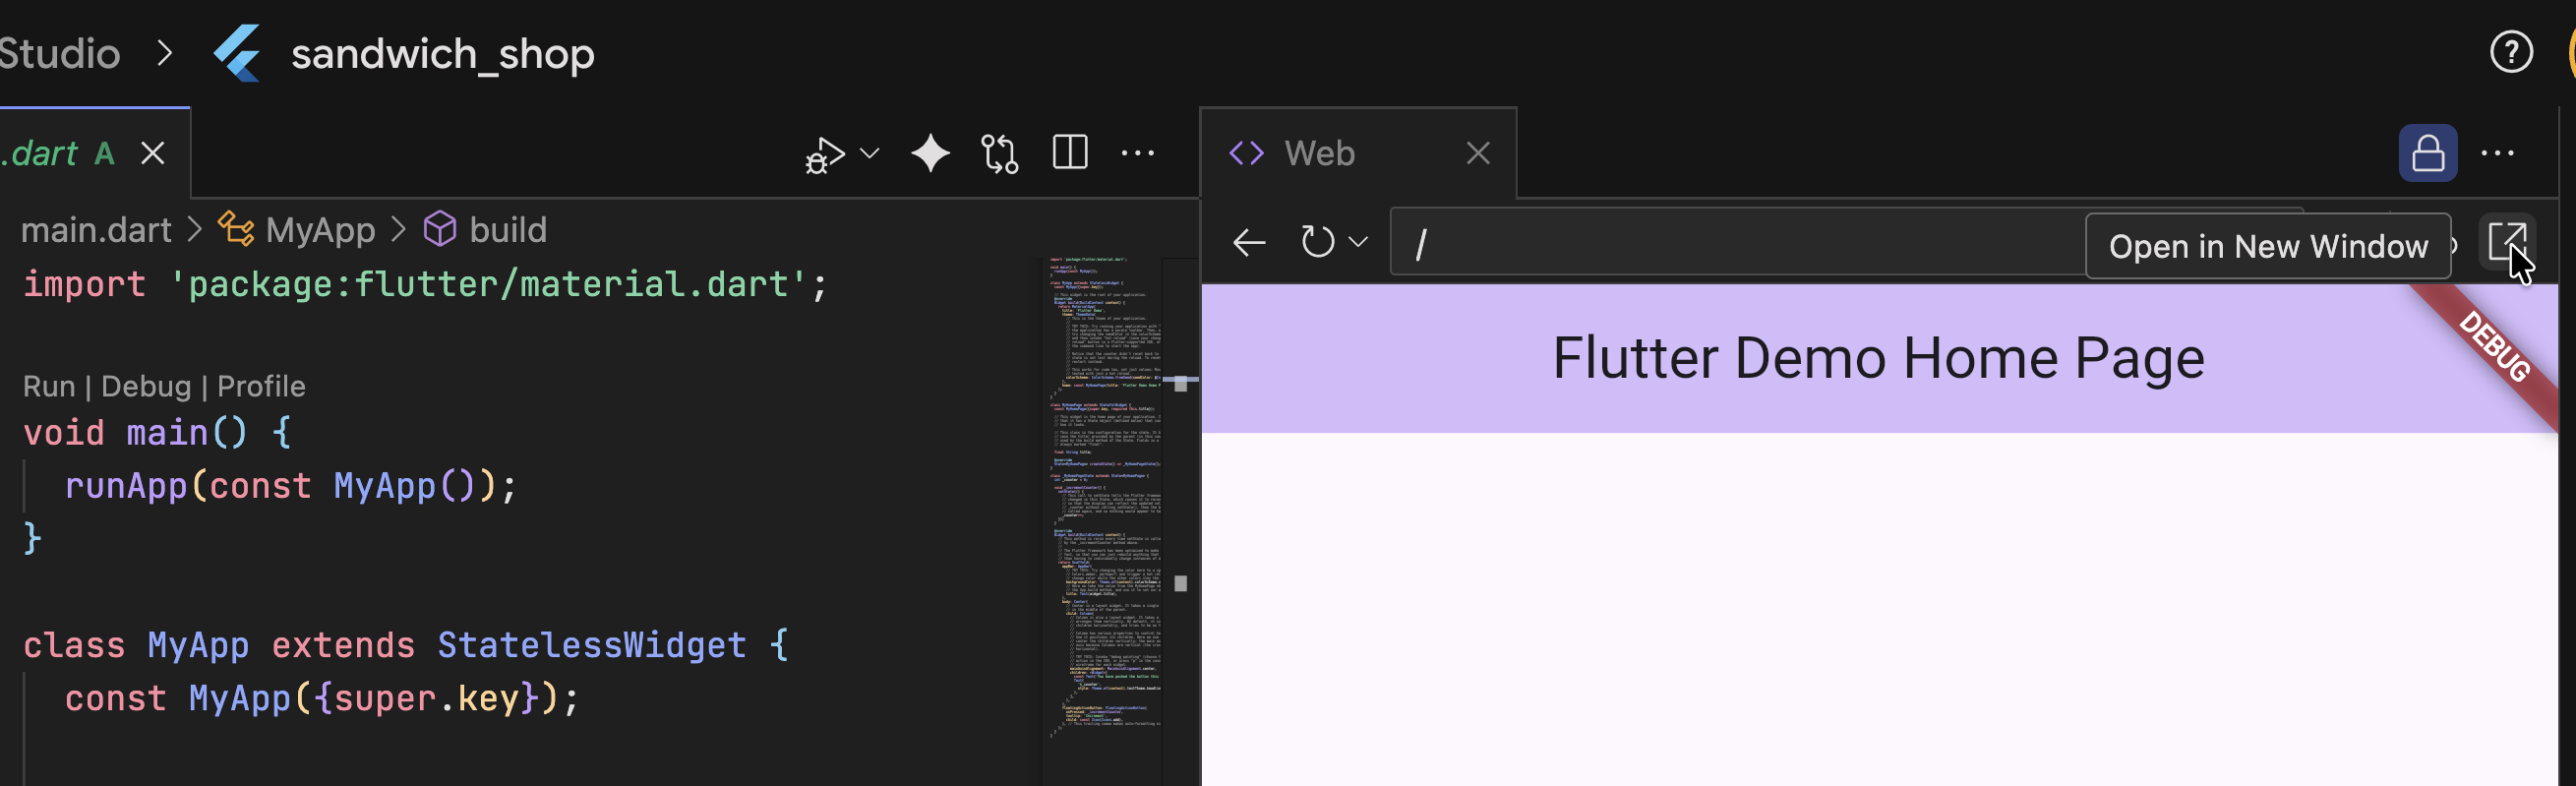
In Firebase Studio, your app should already be running in a web browser. If it is not, open the Command Palette with Ctrl + Shift + P (or ⌘ + Shift + P on macOS) and type Firebase Studio: Show Web Preview. You can also open this as a separate tab by clicking on the “Open in New Window” icon as shown below. You need to trust the domain to allow pop-ups.
On VS Code, you need to select a target device to run your app. At the bottom right of the VS Code window is the status bar. Click on the device name (it might say “No Device”) to open the device selector. For now, choose a browser like Edge or Chrome. Alternatively, you can open the Command Palette (Ctrl + Shift + P or ⌘ + Shift + P) and type Flutter: Select Device. Then select your browser from the list.

Running the app
You can run the app in several ways, for example by pressing the F5 key, opening a new terminal and running flutter run, or clicking the “Run” button that appears above the main function in lib/main.dart.
You can also open the Command Palette (Ctrl + Shift + P or ⌘ + Shift + P) and type Terminal: Create New Terminal to open a terminal, then run the following command:
flutter run
VS Code will build and run your application, which should open in a browser window. Click the + button to see the counter increase.
Viewing the app as a mobile app
For the purpose of this module, you will primarily be developing applications designed for mobile devices. While running the app in a web browser is convenient, it’s important to view it in a mobile layout. You can achieve this using your browser’s developer tools or by running a device emulator.
Using browser developer tools
When your app is running in the browser (Chrome, Edge or a similar browser, but not Safari!), you can simulate a mobile view. Right-click anywhere on the page and select Inspect or Developer Tools. You could alternatively press the F12 key. This will open the developer tools.
In the developer tools panel, look for an icon that looks like a phone and tablet, often called the Toggle device toolbar. Click it to switch to a mobile device view. Below is an example of how it looks in Chrome.

You can then use the dropdown menu at the top of the screen to select different device presets, such as an iPhone or a Pixel, to see how your app looks and behaves on various screen sizes.
Using an emulator
A more accurate way to test is by using an emulator, which simulates a physical device on your computer.
In VS Code, you can launch an emulator by clicking the device name in the status bar at the bottom right and selecting a configured emulator, or choosing Start Android Emulator (and on macOS, Start iOS Simulator). This requires a more detailed setup, which typically involves installing Android Studio or Xcode, for more information refer to the final exercise in this worksheet.
In Firebase Studio, an Android emulator is usually available by default. If it is not running, you can launch/show it from the Command Palette with Ctrl + Shift + P (or ⌘ + Shift + P on macOS) and typing Firebase Studio: Show Android Emulator Preview.
Using hot reload
Hot reload is a powerful feature that lets you see code changes instantly without restarting the app.
You can enable it by clicking the lightning bolt icon (⚡) at the top of VS Code while the app is running. If you are using the terminal, you can type r to trigger it.
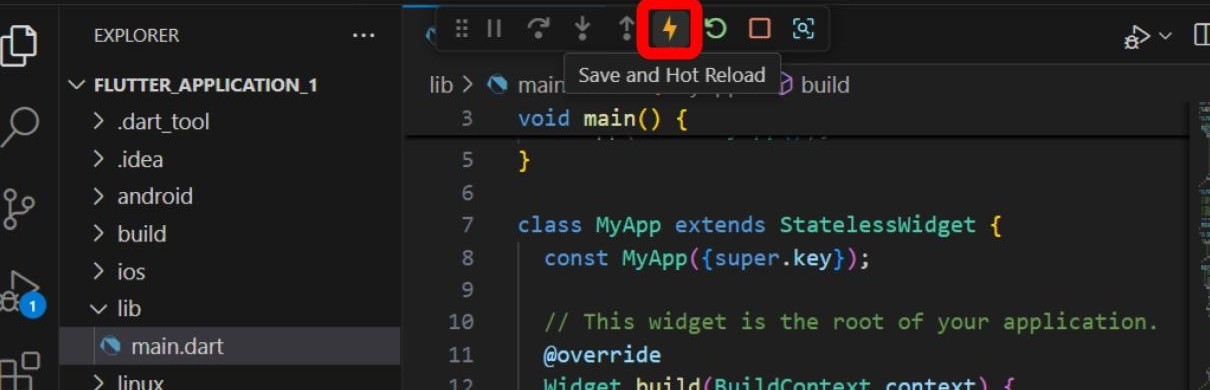
As an example, while the app is running, enable hot reload and change the colorSchemeSeed property inside the ThemeData widget in lib/main.dart from Colors.deepPurple to Colors.orange and save the file. You should see the UI update in the browser instantly.
Setting up a GitHub repository
Lastly, let’s put our project on GitHub to track changes and back it up online.
Initialising the repository
You should ignore this step if you are using Firebase Studio as it already initialises a Git repository for you. Skip to Making the first commit.
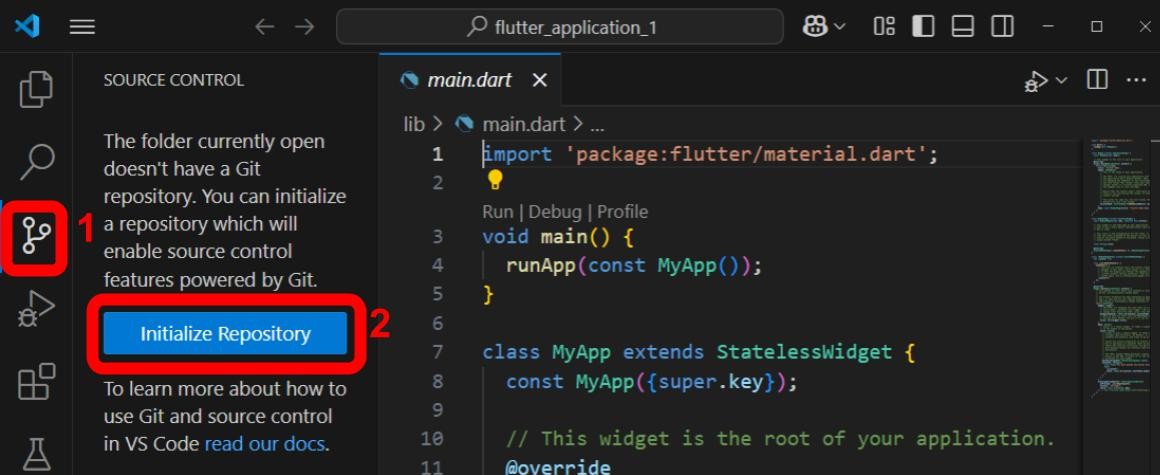
In the Activity Bar on the left, click the Source Control icon. Click on Initialize Repository to set up Git for your project.
Alternatively, you can run the following command in the terminal to initialise Git:
git init
Making the first commit
You should now see all your project files listed in the Source Control panel. Hover over Changes and click the + icon to stage all files. Then, enter a commit message like Initial commit in the text box and click the Commit button to commit your changes.

Alternatively, you can run the following commands in the terminal:
git add .
git commit -m "Initial commit"
You might see a pop-up asking to stage all changes and commit them directly; you can click Always to skip this in the future.
The Commit button will now say Publish Branch:
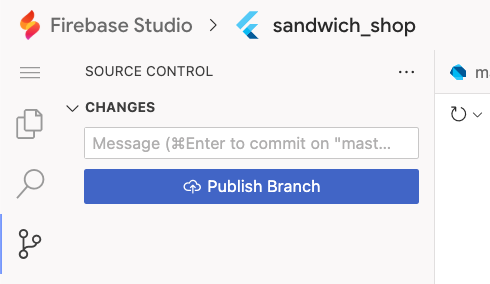
Or Sync Changes:

Click this to push your local repository to GitHub. You may be asked to allow VS Code (or Firebase Studio) to log in to your GitHub account.
Next, you will be asked to name your repository; enter sandwich_shop. Let this be a public repository and click Publish Repository.

Verifying the repository on GitHub
You can verify that the project was published by navigating to your GitHub account in a web browser. You should see the newly created sandwich_shop repository.
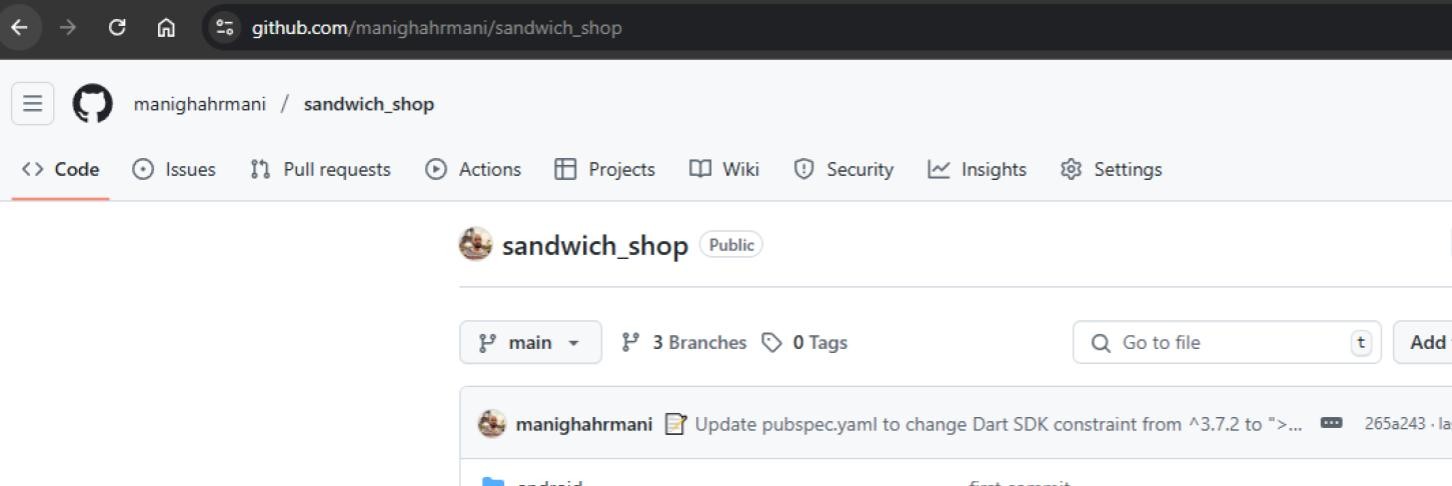
The link will look like https://github.com/YOUR_USERNAME/sandwich_shop where YOUR_USERNAME is your GitHub username.
Making another commit
Let’s make another commit. In lib/main.dart, change the text in the AppBar widget from Flutter Demo Home Page to My Sandwich Shop. Save the file (Ctrl + S or ⌘ + S) or better yet, enable auto-save by opening the Command Palette (Ctrl + Shift + P or ⌘ + Shift + P) and typing Auto Save, then press Enter to select Toggle Auto Save.
Go back to the Source Control panel (use the Command Palette and enter Focus on Source Control View if you can’t see it), stage the changes, and commit them with a message like Change AppBar title. Remember to always write meaningful commit messages that describe what changes you made. The commit message should ideally be written in the imperative mood, like Add new feature or Fix bug.
Before you click on commit, you can also click on the changed files below the Changes section to see the differences (diff) between the current version and the last committed version.

Once you have clicked on commit and then sync changes, you should be able to see the changes to the file in your GitHub repository.
Exercises
Complete the exercises below and show your work to a member of staff present at your next practical for a sign-off.
If you are new to programming and find it easier to watch a video tutorial, consider making a separate project and following the “Your first Flutter app” Codelab. It teaches you pretty much what we cover in this worksheet and the next one.
-
In the “Setting up a GitHub repository” section, we walked you through creating a GitHub repository to back up the
sandwich_shopproject. Make sure you have completed this section and you are comfortable with the process of making commits and pushing them to GitHub.⚠️ Show your GitHub repository to a member of staff for a sign-off.
-
You have already modified the title of the
AppBarwidget. This is different from the title of the app itself, which you can see in the browser tab. This is highlighted in the image below: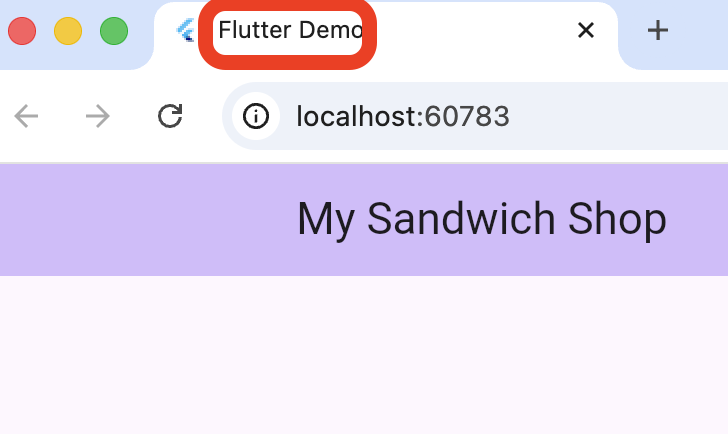
As a simple exercise, find out what determines the title of the app in the code and change it to something more appropriate, like “Sandwich Shop App”. Hint: VS Code and Firebase Studio have a search feature that you can access by pressing Ctrl + Shift + F (or ⌘ + Shift + F on macOS). You can use this to search for the current title of the app.
Remember to view the changes live with hot reload and to commit your changes to GitHub.
⚠️ Show your running app with the updated browser tab title to a member of staff for a sign-off.
-
The default app displays a counter. Your task is to change this by finding the
Columnwidget inside the_MyHomePageStatein yourlib/main.dartfile.First, remove the second
Textwidget inside the column. This may cause the Flutter analyser to show a warning (blue squiggly line). Hover your mouse over the highlighted code and read the message. You can use theQuick Fixoption that appears below this message to apply the suggested fix (you can also open the Quick Fix menu by pressing Ctrl + . or ⌘ + . on macOS). You may also have a separate warning message (yellow squiggly line) somewhere else in the file. Find it and fix it too.Next, modify the remaining
Textwidget so that it displays a static welcome message, like “Welcome to my shop!” instead of the counter variable.Optionally, you can give your message some style by using the
styleproperty on theTextwidget, which accepts aTextStyle. Look at the official documentation for the TextStyle class to see how to change properties likefontSize,color, andfontWeightor use Copilot to help you with this.Make sure that you understand what is happening at every step. On rare occasions, AI assistants may not provide a correct solution. More often, they provide an overly optimal solution that may be hard to understand for you. If you saw a syntax you are not familiar with for example, a ternary operator (
condition ? expr1 : expr2), ask your AI assistant to explain it to you or use a simpler approach like anifstatement.⚠️ Show your running app with the new welcome message to a member of staff for a sign-off.
-
The
pubspec.yamlfile is the heart of your project’s configuration, managing dependencies, fonts, and project metadata. Open this file and take a moment to read through it, using an LLM or the official documentation on the pubspec file to understand each section.Your task is to modify the file to match the cleaned-up version below. This involves changing the project name and description, updating the Dart SDK environment constraint, and removing the comments to make the file is shorter.
name: sandwich_shop
description: "A Flutter project for a sandwich shop."
publish_to: "none"

version: 1.0.0+1

environment:
  sdk: ">=2.17.0 <4.0.0"

dependencies:
  flutter:
    sdk: flutter
  cupertino_icons: ^1.0.0

dev_dependencies:
  flutter_test:
    sdk: flutter
  flutter_lints: ^2.0.0

flutter:
  uses-material-design: true
After saving your changes, you must synchronise the dependencies. While VS Code and Firebase Studio often does this automatically, you should run
flutter pub getin the terminal to ensure everything is up to date.⚠️ Show your updated
pubspec.yamlfile to a member of staff for a sign-off. -
Keeping your code tidy is crucial for readability and collaboration. Dart has a standard format that can be applied automatically.
First, deliberately mess up the formatting in your
lib/main.dartfile. For example, add extra spaces or remove newlines or indentation for a few widgets.Next, right-click in the editor and select
Format Document. You can also open the command palette with Ctrl+Shift+P (or ⌘+Shift+P on macOS) and typeFormat Documentto find the command. Notice how the code snaps back to the correct style. You can also set this to happen automatically on save by enabling theeditor.formatOnSavesetting. Ask your LLM for help with this.For more details, refer to the official documentation on code formatting.
This task is optional and there’s no need to show it to a member of staff for a sign-off.
-
The Flutter SDK can automatically fix many problems in your code. For example the LLMs that you may be using could generate deprecated code for you.
To see how the SDK can fix your code for you, go to your
lib/main.dartfile and find theTextwidget responsible for displaying the counter. The code for this widget looks like this:Text( '$_counter', style: Theme.of(context).textTheme.headlineMedium, ),Temporarily change the style from
headlineMediumto the older, deprecated nameheadline4. After your change, the code should look like this:Text( '$_counter', style: Theme.of(context).textTheme.headline4, ),VS Code should highlight
headline4as a problem. Hover over the it and use theQuick Fixoption that appears. It will suggest replacing the deprecated style with its modern equivalent (headlineMedium). Apply the fix and then commit your changes.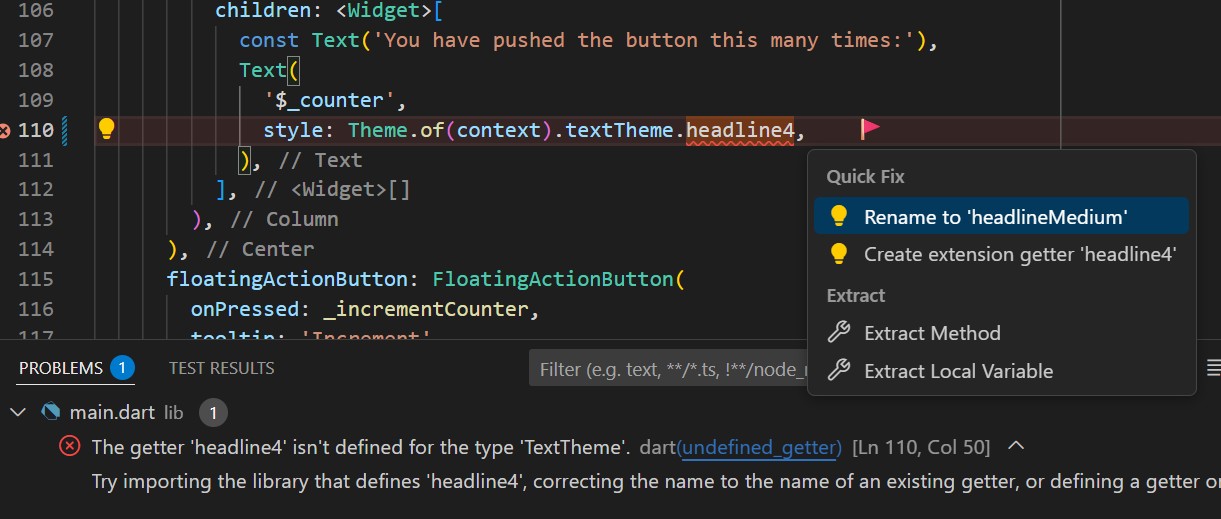
Learn more about this feature from the official Flutter fix documentation.
This task is optional and there’s no need to show it to a member of staff for a sign-off.
-
(Advanced) Running your app in a browser is great for quick development, but the ultimate aim of learning Flutter is to build natively compiled applications for mobile, web, and desktop from a single codebase (cross-platform development).
For this task, follow the official documentation to set up your physical phone or an emulated device for development and run the app on it. You can find instructions to set up an Android device or an iOS device on the Flutter website.
This task is optional and there’s no need to show it to a member of staff for a sign-off.