sandwich_shop
Worksheet 4 — App Architecture, Testing and README
What you need to know beforehand
Ensure that you have already completed the following:
- Worksheet 0 — Introduction to Dart, Git and GitHub.
- Worksheet 1 — Introduction to Flutter.
- Worksheet 2 — Stateless Widgets.
- Worksheet 3 — Stateful widgets.
Getting help
To get support with this worksheet, join the Discord channel and ask your questions there. Otherwise, attend your timetabled session and ask a member of staff for help.
Introduction to App Architecture
As your app grows, it’s important to have a clear and organised structure. Generally speaking, we need to organise our code into different layers, each with its own responsibility.
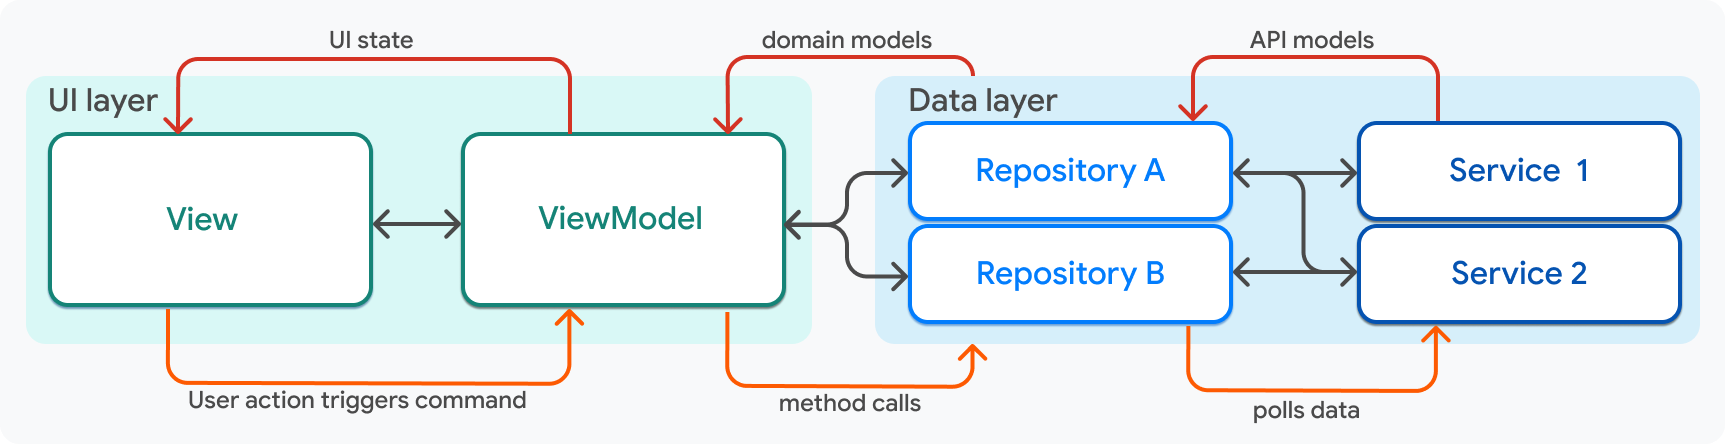
For this worksheet, we will be following the simple Model-View-ViewModel (MVVM) architecture. It recommends separating your app into the following layers which roughly translate to folders in your lib directory:
- Views: These are the widgets that make up your app’s user interface (UI).
- View Models: These are the classes that sit between the views and the repositories (not to be confused with GitHub repositories). They are responsible for retrieving data from the repositories and transforming it into a format that can be easily displayed by the views. They also include things like the callbacks that allow the view to interact with the data.
- Repositories: These are the classes that are responsible for providing data to the view models. They typically interact with services to fetch data.
- Services: These are the classes that are responsible for fetching data from external sources, such as cloud services or a database.
Here is a diagram that shows how these layers interact with each other:
If you would like to learn more about app architecture, you can read the official Flutter documentation.
In this worksheet we will focus on the first three layers: views, view models, and repositories. Services wrap API endpoints and are typically used for fetching data asynchronously from external sources. We will learn more about services in a later worksheet.
Getting started
For this worksheet, you need to start with the code from branch 3 of our GitHub repository. You can either clone the repository and checkout branch 3:
git clone https://github.com/manighahrmani/sandwich_shop.git
cd sandwich_shop
git checkout 3
Or manually ensure your code matches the repository. Run the app to make sure everything works as expected before proceeding. Note that we have already completed the exercises from the previous worksheets.
Refactoring our code
Refactoring is the process of restructuring existing code to improve its readability, maintainability, or performance, without changing its behaviour.
Styles
Take a peek at the code at the branch 4 of our repository. You’ll be using this code next week.
Make a new app_styles.dart file in your project. Open this link and copy the contents of the file into your new app_styles.dart file in the lib folder of your project.
This is a simple example of refactoring styles out of the main UI code. This file contains the styles used in our app much like a CSS file in web development. Note that this is not a mandatory way of managing styles in Flutter, you as the developer can choose to manage the architecture of your app in any way you see fit.
Also note that you can add more styles to this file as needed and use it across multiple files. Open the main.dart at branch 4, update your code accordingly, and observe how app_styles.dart is imported, and check to see where these styles are used (use the search functionality in VS Code Shift + Ctrl + F on Windows or Shift + ⌘ + F on macOS and search for variables like normalText).
If you are confused by some of the changes (for example the use of enums), you may want to read the non-compulsory questions on the last worksheet again.
Folder structure
Next, open the Explorer view in VS Code with Ctrl + Shift + E on Windows or ⌘ + Shift + E on macOS. Right-click on the lib folder and select New Folder. Name this folder views. Similarly, create the following folders in the lib folder: view_models, and repositories.
Drag and drop the app_styles.dart file into the views subfolder of the lib folder. Keep main.dart in the lib folder as Flutter needs it there to find your app’s entry point. Make sure that after this move, the import statement in main.dart is updated to:
import 'package:sandwich_shop/views/app_styles.dart';
Your folder structure should now look like this:
lib/
  ├── main.dart
  ├── views/
  │   └── app_styles.dart
  ├── view_models/
  └── repositories/
Commit your changes (1)
Before moving on, commit this restructuring of the folder, addition of the app_styles.dart file, and the updates in the main.dart file with commit messages like Restructure folder into views, view_models, and repositories, Add app_styles.dart for managing styles, Update main.dart to use app_styles.dart and sync your changes to GitHub.
Creating a repository class
Now, let’s create a more meaningful separation by moving the business logic out of our UI code. Business logic refers to custom rules for managing the business, in our case, this is the limit on sandwich quantity. The logic for managing the sandwich quantity (incrementing, decrementing, and checking limits) doesn’t need to be inside the _OrderScreenState of main.dart. We can move it to a dedicated class in the repositories folder.
Right-click on the repositories folder and select New File. Name this file order_repository.dart. Open this file and add the following code to it. This class will now be the single source of truth for our order’s quantity. Notice the new boolean getter methods canIncrement and canDecrement which encapsulate the logic for checking the quantity limits.
class OrderRepository {
  int _quantity = 0;
  final int maxQuantity;

  OrderRepository({required this.maxQuantity});

  int get quantity => _quantity;

  bool get canIncrement => _quantity < maxQuantity;
  bool get canDecrement => _quantity > 0;

  void increment() {
    if (canIncrement) {
      _quantity++;
    }
  }

  void decrement() {
    if (canDecrement) {
      _quantity--;
    }
  }
}
With the logic moved, we can now simplify our _OrderScreenState class in main.dart.
First, update the imports at the top of your main.dart file. Since we moved app_styles.dart to the views folder, you’ll need to update that import and add the OrderRepository import:
import 'package:sandwich_shop/views/app_styles.dart';
import 'package:sandwich_shop/repositories/order_repository.dart';
Next, replace the entire _OrderScreenState class in your main.dart file with the following updated code.
class _OrderScreenState extends State<OrderScreen> {
  late final OrderRepository _orderRepository;
  final TextEditingController _notesController = TextEditingController();
  bool _isFootlong = true;
  BreadType _selectedBreadType = BreadType.white;

  @override
  void initState() {
    super.initState();
    _orderRepository = OrderRepository(maxQuantity: widget.maxQuantity);
    _notesController.addListener(() {
      setState(() {});
    });
  }

  @override
  void dispose() {
    _notesController.dispose();
    super.dispose();
  }

  VoidCallback? _getIncreaseCallback() {
    if (_orderRepository.canIncrement) {
      return () => setState(_orderRepository.increment);
    }
    return null;
  }

  VoidCallback? _getDecreaseCallback() {
    if (_orderRepository.canDecrement) {
      return () => setState(_orderRepository.decrement);
    }
    return null;
  }

  void _onSandwichTypeChanged(bool value) {
    setState(() => _isFootlong = value);
  }

  void _onBreadTypeSelected(BreadType? value) {
    if (value != null) {
      setState(() => _selectedBreadType = value);
    }
  }

  List<DropdownMenuEntry<BreadType>> _buildDropdownEntries() {
    List<DropdownMenuEntry<BreadType>> entries = [];
    for (BreadType bread in BreadType.values) {
      DropdownMenuEntry<BreadType> newEntry = DropdownMenuEntry<BreadType>(
        value: bread,
        label: bread.name,
      );
      entries.add(newEntry);
    }
    return entries;
  }

  @override
  Widget build(BuildContext context) {
    String sandwichType = 'footlong';
    if (!_isFootlong) {
      sandwichType = 'six-inch';
    }

    String noteForDisplay;
    if (_notesController.text.isEmpty) {
      noteForDisplay = 'No notes added.';
    } else {
      noteForDisplay = _notesController.text;
    }

    return Scaffold(
      appBar: AppBar(
        title: const Text(
          'Sandwich Counter',
          style: heading1,
        ),
      ),
      body: Center(
        child: Column(
          mainAxisAlignment: MainAxisAlignment.center,
          children: <Widget>[
            OrderItemDisplay(
              quantity: _orderRepository.quantity,
              itemType: sandwichType,
              breadType: _selectedBreadType,
              orderNote: noteForDisplay,
            ),
            const SizedBox(height: 20),
            Row(
              mainAxisAlignment: MainAxisAlignment.center,
              children: [
                const Text('six-inch', style: normalText),
                Switch(
                  value: _isFootlong,
                  onChanged: _onSandwichTypeChanged,
                ),
                const Text('footlong', style: normalText),
              ],
            ),
            const SizedBox(height: 10),
            DropdownMenu<BreadType>(
              textStyle: normalText,
              initialSelection: _selectedBreadType,
              onSelected: _onBreadTypeSelected,
              dropdownMenuEntries: _buildDropdownEntries(),
            ),
            const SizedBox(height: 20),
            Padding(
              padding: const EdgeInsets.all(40.0),
              child: TextField(
                key: const Key('notes_textfield'),
                controller: _notesController,
                decoration: const InputDecoration(
                  labelText: 'Add a note (e.g., no onions)',
                ),
              ),
            ),
            const SizedBox(height: 20),
            Row(
              mainAxisAlignment: MainAxisAlignment.center,
              children: [
                StyledButton(
                  onPressed: _getIncreaseCallback(),
                  icon: Icons.add,
                  label: 'Add',
                  backgroundColor: Colors.green,
                ),
                const SizedBox(width: 8),
                StyledButton(
                  onPressed: _getDecreaseCallback(),
                  icon: Icons.remove,
                  label: 'Remove',
                  backgroundColor: Colors.red,
                ),
              ],
            ),
          ],
        ),
      ),
    );
  }
}
You may get errors about missing classes like OrderItemDisplay and StyledButton, and the BreadType type. If you don’t have have these implemented yet, feel free to copy them from branch 4’s main.dart.
Open the Source Control view in VS Code with Ctrl + Shift + G on Windows or ⌃ + Shift + G on macOS. You should see a list of changes that you have made to your project. Click on main.dart to see a side-by-side comparison of the old and new code. Pay attention to the changes that have been made.
Can you get Copilot to explain why we no longer need the _quantity variable in this class? How has the logic for incrementing and decrementing changed?
Notice that the _getIncreaseCallback and _getDecreaseCallback methods use the canIncrement and canDecrement getters from the repository to decide whether the button should be enabled. This way, if we change the logic for incrementing or decrementing, we only need to update it in the repository.
Commit your changes (2)
Remember to commit your changes at each stage with a meaningful commit message before moving on.
Unit testing
Writing tests help you ensure that your code works as expected and helps prevent bugs from creeping in as you make changes and add new features. There are three main types of tests in Flutter:
- Unit tests: These tests verify the smallest testable parts of an application, called “units”, in isolation. In our case, the
OrderRepositoryclass is a perfect example of a unit. - Widget tests: These tests verify the UI and interactions of individual widgets. They can simulate user interactions and verify that the widget behaves as expected.
- Integration tests: These tests verify the integration of multiple components (how they work together). They can simulate user interactions and verify that the app behaves as expected.
For more information, you can read the official Flutter documentation on testing. In this worksheet, we will focus on unit tests and widget tests.
You should already have a test folder in your project (this is created automatically when you create a new Flutter project) and inside this folder there should be a widget_test.dart file which we have maintained so far.
Add subfolders to the test folder for unit testing and widget testing. For our new repository, create a repositories folder inside the test folder.
Unit testing example
Now that we have moved our business logic into a pure Dart class (OrderRepository), we can write a unit test for it without needing to build any widgets.
Create a new file called order_repository_test.dart in the test/repositories folder.
This is what your folder structure should look like:
lib/
  ├── main.dart
  ├── views/
  │   └── app_styles.dart
  ├── view_models/
  └── repositories/
      └── order_repository.dart
test/
  ├── repositories/
  │   └── order_repository_test.dart
  └── widget_test.dart
Add the following code to order_repository_test.dart. We are importing the flutter_test package which comes pre-installed with Flutter and provides the necessary tools for writing tests. We are also importing the OrderRepository class that we want to test.
import 'package:flutter_test/flutter_test.dart';
import 'package:sandwich_shop/repositories/order_repository.dart';

void main() {
  group('OrderRepository', () {
    test('initial quantity should be 0', () {
      final repository = OrderRepository(maxQuantity: 5);
      expect(repository.quantity, 0);
    });

    test('increment should increase quantity by 1', () {
      final repository = OrderRepository(maxQuantity: 5);
      repository.increment();
      expect(repository.quantity, 1);
    });

    test('decrement should decrease quantity by 1', () {
      final repository = OrderRepository(maxQuantity: 5);
      repository.increment(); // quantity is now 1
      repository.decrement(); // quantity is now 0
      expect(repository.quantity, 0);
    });

    test('quantity should not exceed maxQuantity', () {
      final repository = OrderRepository(maxQuantity: 2);
      repository.increment(); // quantity is 1
      repository.increment(); // quantity is 2
      repository.increment(); // should not change
      expect(repository.quantity, 2);
    });

    test('quantity should not go below 0', () {
      final repository = OrderRepository(maxQuantity: 5);
      repository.decrement(); // should not change
      expect(repository.quantity, 0);
    });
  });
}
The tests in this file are grouped using the group function, which helps organise related tests together. Each individual test is defined using the test function. The general format of a unit test is:
test('description of the test', () {
  // Arrange: set up any necessary objects or conditions
  final object = /* create object */;
  // Act: perform the action you want to test
  object.someMethod();
  // Assert: check that the expected outcome occurred
  expect(object.someProperty, expectedValue);
});
As you can see, the test function takes a description of the test (as a String) and a callback function. In the callback, we typically follow the Arrange-Act-Assert pattern described in the code snippet above. Notice how the expect function is used to verify that the actual value matches the expected value (this is a built-in function provided by flutter_test). Feel free to ask your AI assistant if you have any questions.
Commit your changes (3)
Once again, make sure that you have committed your changes.
What to expect when you run tests
Run these tests while the order_repository_test.dart is open in VS Code and click on the Run link above the main function. You should see the test results in the terminal panel at the bottom of VS Code as shown below:
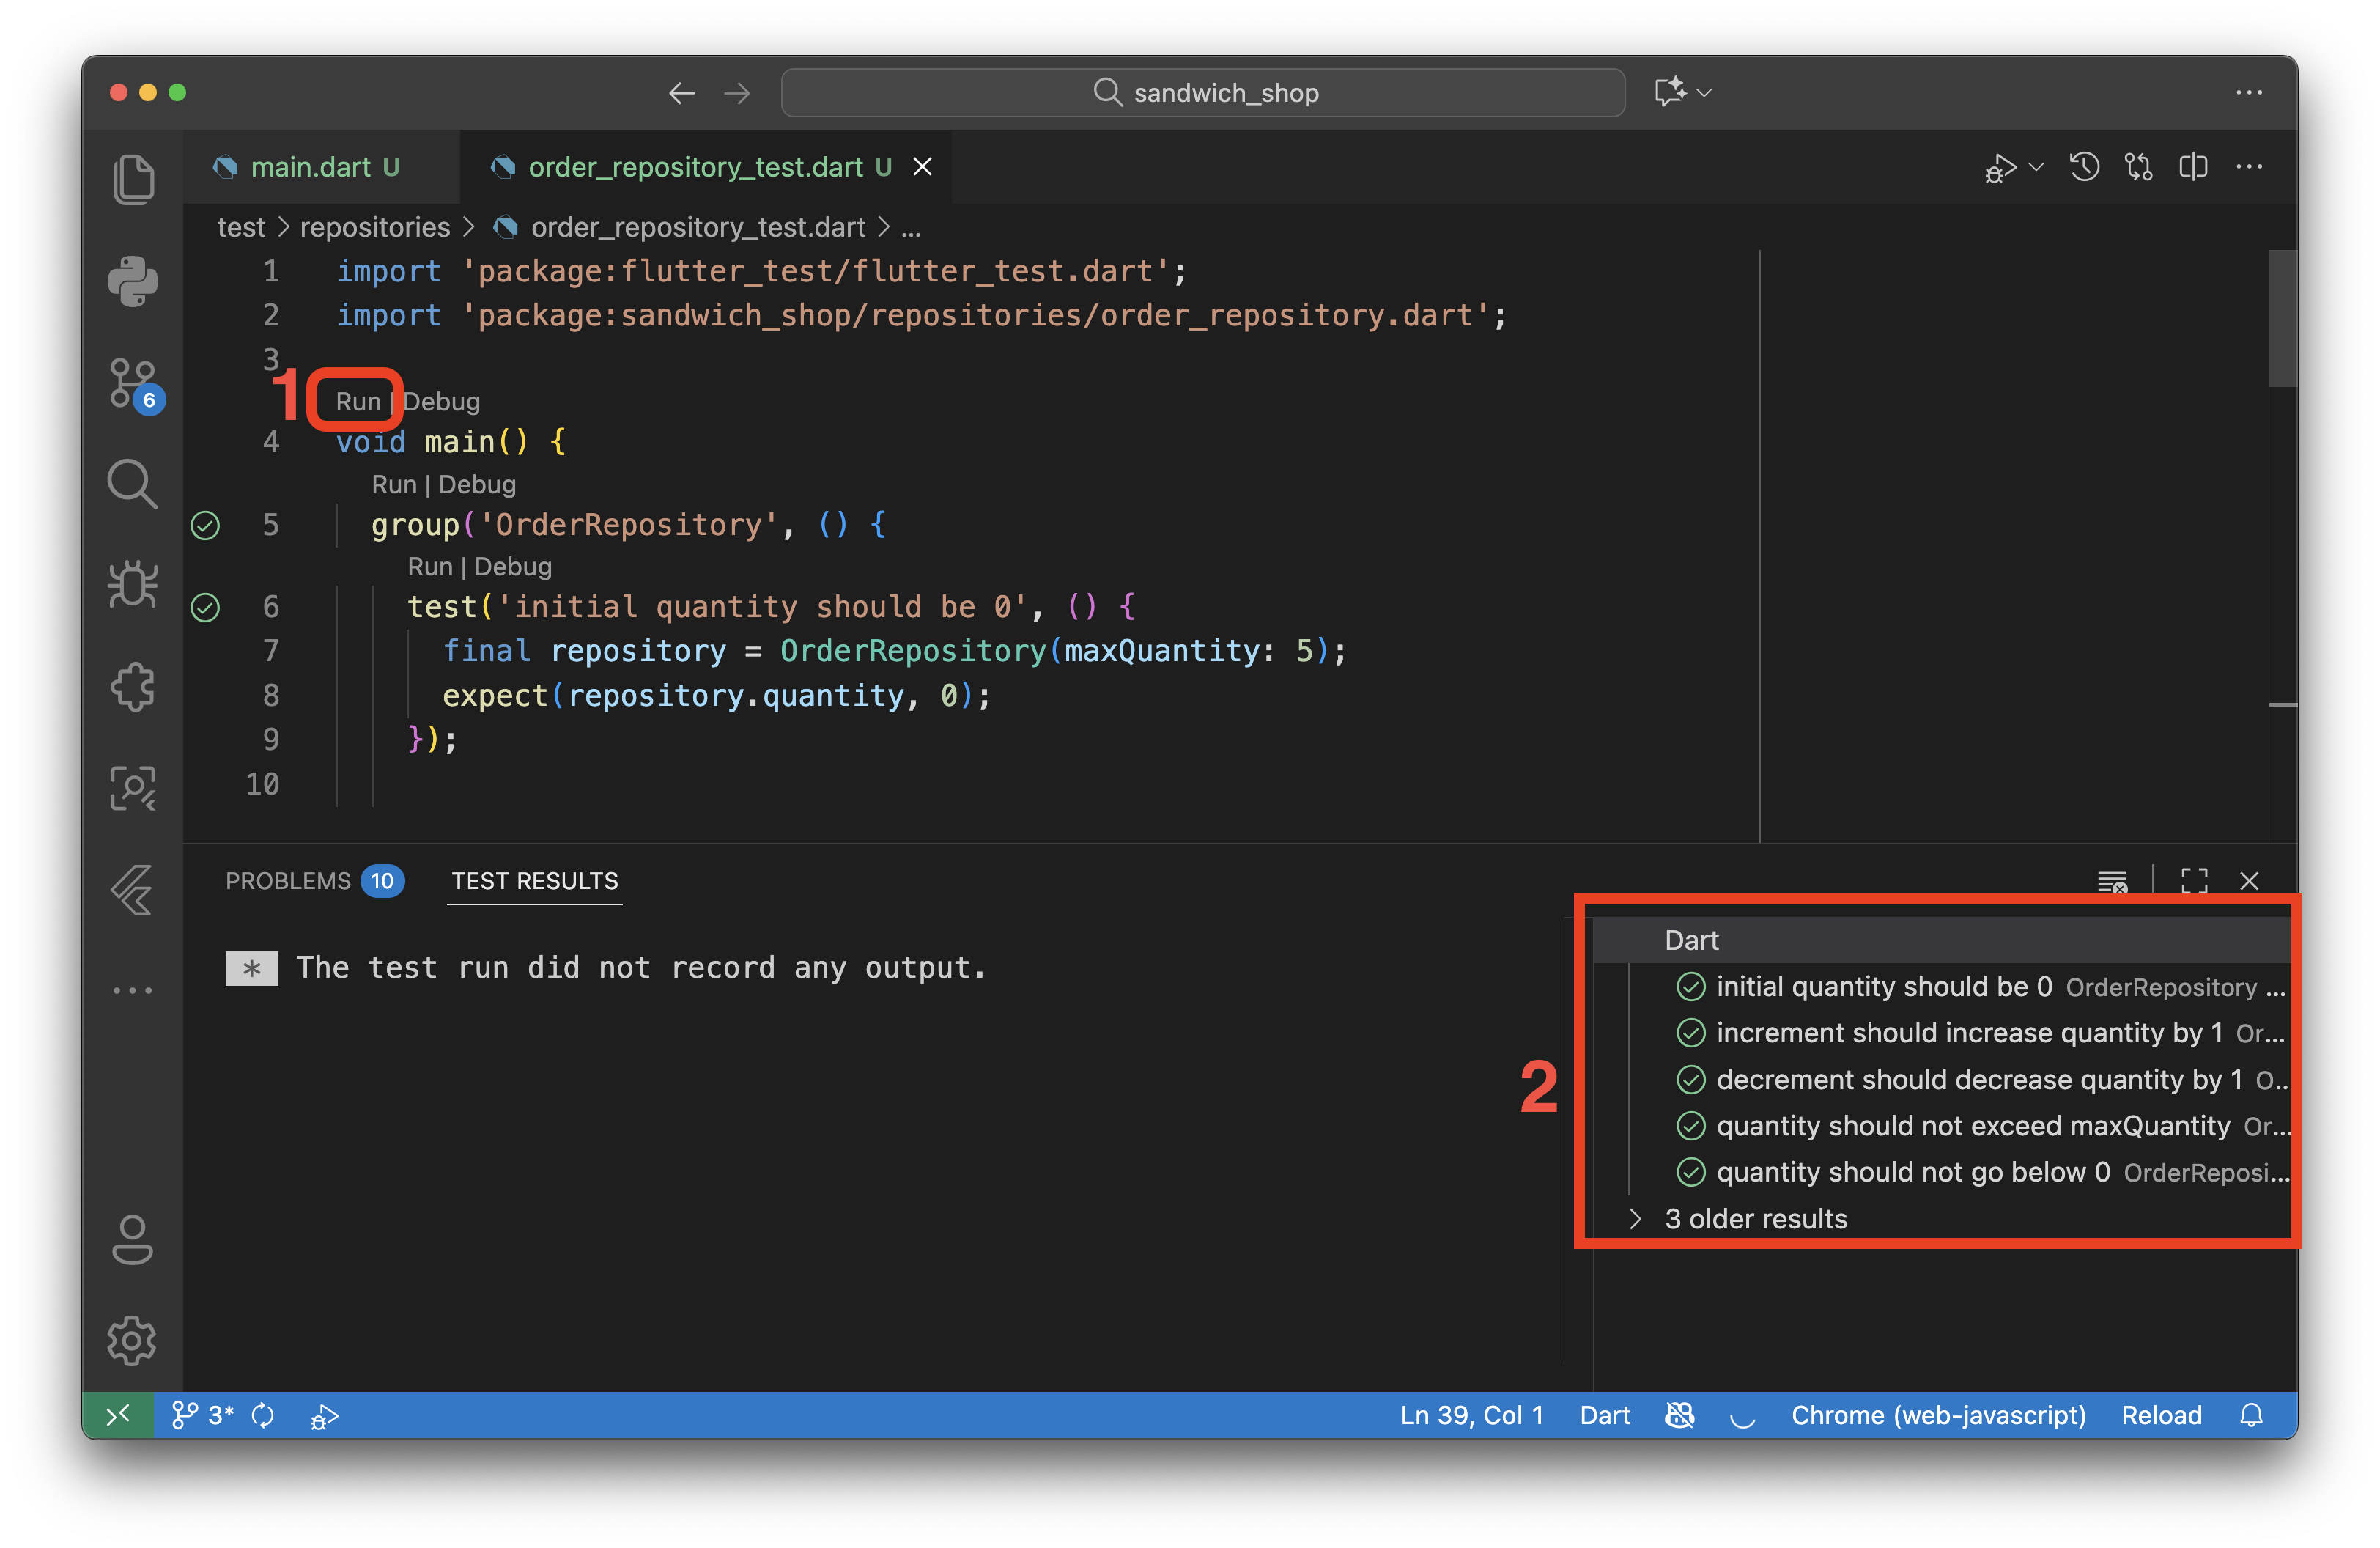
Each green tick means that the test passed. On the other hand, a red cross (❌) would mean the test failed, and you will see a detailed error message explaining what went wrong—for example, Expected: <1>, Actual: <0>. This feedback is crucial for understanding what has gone wrong in your code.
You can also run all tests at once by opening a terminal and running flutter test. This command will execute all tests in your test folder, including both unit tests and widget tests. As you create more tests throughout this course, this becomes a convenient way to verify that all your code is working correctly.
Commit your changes (4)
Before we move to widget testing, ensure that you have committed and synced all your changes to GitHub.
Widget testing
The widget_test.dart file in branch 4 provides you with an example of widget testing. Copy the contents of this file into the existing widget_test.dart file in the test folder. Create a new folder called views inside the test folder and move the widget_test.dart file into this new folder.
This is what your folder structure should look like now:
lib/
  ├── main.dart
  ├── views/
  │   └── app_styles.dart
  ├── view_models/
  └── repositories/
      └── order_repository.dart
test/
  ├── repositories/
  │   └── order_repository_test.dart
  └── views/
      └── widget_test.dart
Next, open widget_test.dart. Before making any changes, try running the tests by clicking the Run link above the main function. The tests should run successfully.
You’ll notice each test is defined with testWidgets instead of test. This function takes a WidgetTester object in its callback parameter, which is conventionally named tester. The tester is our main tool for building and interacting with our UI in the test environment.
The general format of a widget test is:
testWidgets('description of the test', (WidgetTester tester) async {
  const widgetToBeTested = /* widget code here */;
  // Construct the widget
  await tester.pumpWidget(widgetToBeTested);
  // If it is an interactive widget, simulate user interaction
  await tester.tap(find.byType(SomeWidget));
  // If the interaction causes a state change, rebuild the widget
  await tester.pump();
  // Find the widget you want (by text, type, key, etc.) and verify it
  expect(find.text('expected text'), findsOneWidget);
});
The callback function passed to testWidgets are marked as async, and you will see the await keyword used frequently inside the callbacks. Can you ask your AI assistant why this is necessary or what it even means?
The first step in most tests is pumping the widget into the test environment using await tester.pumpWidget(). This method takes a widget and builds it in the test environment. As mentioned in the code snippet above, when it comes to interactive widgets, after simulating a user interaction like a tap, we often need to call await tester.pump() again to rebuild the widget and reflect any changes resulting from the interaction. For animations, like the opening of the DropdownMenu, we use await tester.pumpAndSettle(), which repeatedly pumps frames until all animations have finished.
To check the results, just like unit tests, we use the expect function. It takes a Finder and a Matcher. A Finder is a way to locate a widget. For example, find.text('Sandwich Counter') looks for a widget displaying that exact text, while find.textContaining('footlong') looks for a widget that includes “footlong” as part of its text. There are other ways of finding widgets which you can read about in the official documentation.
The Matcher, such as findsOneWidget, then verifies that the Finder located the correct number of widgets on the screen. Other examples of matchers include findsNothing (ensures no widgets were found) and findsNWidgets(n) (ensures exactly n widgets were found) but you’ll most commonly use findsOneWidget.
As a small note, observe that in the test for the dropdown menu, the finder find.text('wheat').last is used to select the ‘wheat’ option. We use .last because the word ‘wheat’ might appear in multiple places. Can you guess where else it might appear in the widget tree? Try removing .last and running the test again to see what happens.
Finally, the tests for StyledButton and OrderItemDisplay show how you can test a single widget, making sure it is rendered as expected, without building the entire app. We still need to wrap the widget in a MaterialApp so that it has the necessary context to render correctly.
Commit your changes (5)
Before moving to the exercises, check that you have committed and synced all your changes to GitHub.
Writing a README
One of the most important aspects of software development is the often overlooked documentation. A well-written README file is the first thing people (e.g., employers) see when they visit your portfolio on GitHub.
A README file (usually named README.md) is a file that introduces and explains your project. It’s written in Markdown format, which allows you to format text with headers, lists, links, and images. GitHub has a good cheatsheet on Markdown which we recommend. But as part of the first exercise you will be asking your AI to produce a README for you.
Think of the README serves as the front page of your repository and should provide all the essential information someone needs to understand, install, and use your project.
Components of a README
A README typically includes the following:
1. Project Title and Description
- Clear, descriptive title
- Brief explanation of what the app does
- Key features or functionality
2. Installation and Setup Instructions
- Prerequisites (OS, SDKs, tools, etc.)
- How to clone the repository
- Step-by-step installation guide
- How to run the project
3. Usage Instructions
- How to use the main features
- Any important user flows
- Configuration options if any
- How to run tests
- Ideally some screenshots or GIFs to illustrate the features
5. Project Structure and technologies used (Optional)
- Brief overview of folder organization
- Key files and their purposes
- Key packages or dependencies
- Development tools
6. Known Issues or Limitations (Optional)
- Current bugs or limitations
- Future improvements planned
- Contribution guidelines (if applicable)
7. Contact Information
- Your name and contact details
- Links to other projects or profiles if relevant
A good README is correct and concise. You need to make sure it is formatted, most importantly has clear headings/sections. You are also responsible to update the README regularly as your project evolves. (There are automated ways of doing this, e.g., with GitHub Workflows but this is outside the scope of this module.)
Exercises
Complete the exercises below. Remember to commit your changes after each exercise and use your AI assistant to help you think through the problems rather than just asking for the solution.
-
Use your AI tool of choice to generate a
README.mdfile.Start by creating a new file called
README.mdin your project root. Open Copilot Chat, complete the prompt provided below (the prompt is left incomplete for you to finish) and see what it generates:Generate a comprehensive README.md file for my Flutter sandwich shop app. Look at my project structure and code to understand what the app does. Include: ...Copilot has access to your entire codebase, so it can analyse your project structure, dependencies, and code to create accurate documentation. If this is not automatically and the output is generic and ambiguous, you need to manually attach (the
#symbol) the files that you consider important for Copilot to read. Remember you can provide Copilot screenshots too.If you’re using a browser-based AI, you’ll need to provide context since it can’t see your files. Gather the following information to share with the AI:
- Your project folder structure (from VS Code Explorer)
- Contents of your
pubspec.yamlfile (dependencies and Flutter version) - A brief description of what your app does and its main features
- Any screenshots you’ve taken of your app
Alternatively, use the desktop version of your AI tool or a CLI-based AI tool that can access your files directly. For more information on this, visit worksheet 3.
Once you have a generated README, carefully review it against the quality criteria mentioned in the last section of the worksheet. Is it accurate? Is it complete? Do the instructions work? Do you need to customise anything (feel free to ask the AI to refine the document further).
⚠️ Show your README.md file to a member of staff for a sign-off. If you do attempt any other exercises, remember to update the README accordingly.
-
Our widget tests currently cover tapping buttons and entering text. Let’s expand our test coverage to other types of user interaction.
Write a new widget test in
test/views/widget_test.dartto verify the functionality of theSwitchwidget that toggles between ‘six-inch’ and ‘footlong’.Hint:
Switchwidgets are toggled by tapping on them like buttons.⚠️ Show your new passing widget test to a member of staff for a sign-off.
-
Let’s add an option for the user to have their sandwich toasted. First, in
lib/main.dart, add a new state variable to your_OrderScreenStateclass:bool _isToasted = false;.Next, in the
buildmethod, add the followingRowinside theColumn’schildrenlist, just below theRowfor the existing sandwich typeSwitch(search forSwitchto find it quickly and add this after the closing bracket of thatRow):Row( mainAxisAlignment: MainAxisAlignment.center, children: [ const Text('untoasted', style: normalText), Switch( value: _isToasted, onChanged: (value) { setState(() => _isToasted = value); }, ), const Text('toasted', style: normalText), ], ),Feel free to fully implement this feature by updating the
OrderItemDisplaywidget to show whether the sandwich is toasted or not but this is not required for the purpose of this exercise.The addition of the new switch creates a problem for our widget tests. More specifically, if you have a test that uses
find.byType(Switch), it will now fail because the finder will locate two widgets.To solve this, refer to the Finders documentation and find a way to uniquely identify each
Switchwidget. (Hint: This is similar to giving an HTML element anidattribute.)⚠️ Show your running app with the two switches and the updated, passing widget tests to a member of staff for a sign-off.
-
Our app does not yet have a concept of price. Let’s add a repository to manage the pricing logic. Suppose that a six-inch sandwich costs £7 and a footlong costs £11.
Create a new
PricingRepositoryclass in therepositories. This class should calculate the total price of a sandwich order based on the quantity and sandwich size. This should give you an idea what the constructor of the class should look like and what method(s) it should have.Before integrating this new repository, create a new unit test file similar to what we did for
OrderRepository. Finally, use it inOrderScreento calculate and display the total price of the order.⚠️ Show your new pricing repository and its unit tests to a member of staff for a sign-off.
-
(Advanced) Let’s add functionality to save an order to a local file. This feature is only available on mobile and desktop platforms, so you will need to run your app on a compatible device.
First, add the
path_providerpackage to your project by running the following command in your terminal:flutter pub add path_providerThis package helps find the correct directory to save files. Operations like writing to a device’s storage are asynchronous because they might take some time to complete. In Dart, asynchronous methods return a
Future, which is like a promise that the work will be done.Here’s a simple example, paste it in a file called
async-test.darton the root of your project (not insidelibortestfolders) and run it withdart run async-test.dartto see how it works:Future<int> calculateTheAnswer() async { // Simulate a delay to mimic the delay in reading or writing a file await Future.delayed(const Duration(seconds: 2)); return 42; } void main() async { print('Calculating...'); int result = await calculateTheAnswer(); print('The result is $result'); }Create a
servicesfolder inside thelibfolder. Then, create a newfile_service.dartfile and add create aFileServiceclass in it. This service will handle the external operation of writing to the device’s storage. Follow theCounterStorageclass on the documentation page for reading and writing files when writing this service.Next, we’ll use a simple ViewModel. For this exercise, it’s just a plain Dart class that acts as a bridge between our UI and the
FileService. Create theOrderViewModelclass below in thelib/view_modelsfolder.import 'package:sandwich_shop/services/file_service.dart'; class OrderViewModel { final FileService fileService = FileService(); Future<void> saveOrderToFile({ required int quantity, required bool isFootlong, }) async { String sandwichType = ''; if (isFootlong) { sandwichType = 'footlong'; } else { sandwichType = 'six-inch'; } final String orderDetails = '$quantity $sandwichType sandwich(es)'; await fileService.writeOrder(orderDetails); // This should be a method in FileService } }Finally, update
_OrderScreenStateto use this ViewModel when the user clicks on a newly added “Save Order” button. The button should call thesaveOrderToFilemethod ofOrderViewModel, passing the current order details from the state.Remember to write unit tests for both
FileServiceandOrderViewModelto verify that the file writing logic works as expected. Additionally, feel free to implement a feature to read and display the previous order from the file when the app starts. Can you find out where the file is located on your device? Try adding a print statement to display the file path.This task is optional and there’s no need to show it to a member of staff for a sign-off.
-
(Advanced) Let’s add some images to our app like a company logo in the
AppBar.First, create an
assets/imagesfolder at the root of your project and add a simple logo image to it (e.g.,logo.png). To make assets available to your app, you must declare the folder in yourpubspec.yamlfile. Open it and add anassetssection at the bottom of thefluttersection like this:flutter: uses-material-design: true assets: - assets/images/Update your
OrderScreen’sAppBarto display the logo. (Hint: Visit this documentation page onAppBarwidget and check out theleadingoractionsproperties.) You can find examples of how to load an asset in the Image class documentation.Finally, write a new widget test that verifies the logo is being displayed. A test for an image widget looks for the widget by its type and can even verify that the correct asset path is being used, as shown in the example below.
testWidgets('displays logo in AppBar', (WidgetTester tester) async {
  await tester.pumpWidget(const App());

  // Find the widget by its type
  final imageFinder = find.byType(Image);
  expect(imageFinder, findsOneWidget);

  // For a more robust test, you can check the asset source
  final imageWidget = tester.widget<Image>(imageFinder);
  expect((imageWidget.image as AssetImage).assetName, 'assets/images/logo.png');
});
This task is optional and there’s no need to show it to a member of staff for a sign-off.